 Donna Walsifer
August is fading
I am friendly with my former coworkers at a local school. Two of my friends still work at the school were lamenting that the new school year begins in a mere three weeks. How can it be that summer is almost over? In fact, my husband was asking me when I was going to start making my fresh tomato sauce.
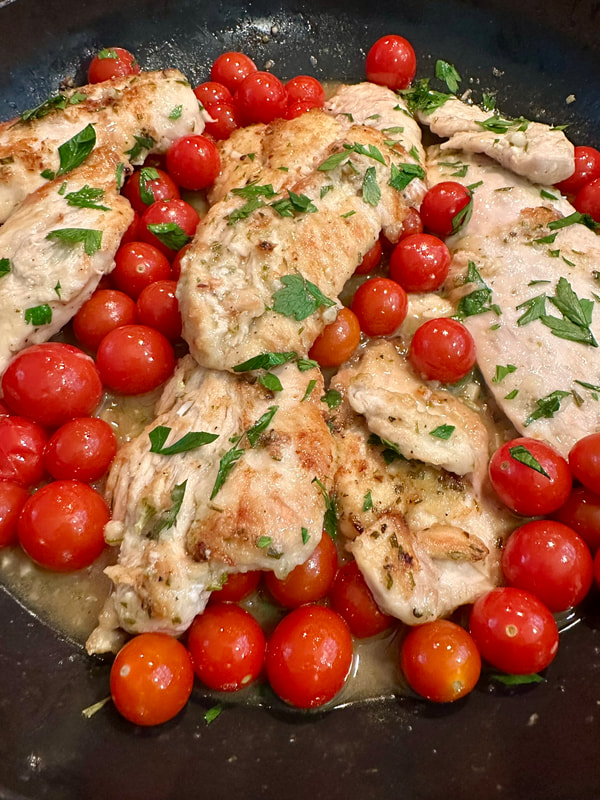
During the summer months, most of my produce comes from two sources either Dreyer Farms in Cranford or Matt’s Farm Market in West Belmar. As I have mentioned before, the tomatoes, peaches and corn have been outstanding. In a recent CSA box, I received a container of cherry tomatoes. Luckily for me I had the perfect recipe from The New York Times/NYT Cooking for Lemon and Garlic Chicken with Cherry Tomatoes. The recipe, by Martha Rose Shulman, calls for extra-virgin olive oil, lemon juice, fresh garlic, fresh rosemary, kosher salt, freshly ground black pepper, boneless and skinless chicken breasts, dry white wine, cherry tomatoes, sugar, all-purpose flour, a neutral oil, fresh parsley. Parmesan cheese is optional.
During the summer months, most of my produce comes from two sources either Dreyer Farms in Cranford or Matt’s Farm Market in West Belmar. As I have mentioned before, the tomatoes, peaches and corn have been outstanding. In a recent CSA box, I received a container of cherry tomatoes. Luckily for me I had the perfect recipe from The New York Times/NYT Cooking for Lemon and Garlic Chicken with Cherry Tomatoes. The recipe, by Martha Rose Shulman, calls for extra-virgin olive oil, lemon juice, fresh garlic, fresh rosemary, kosher salt, freshly ground black pepper, boneless and skinless chicken breasts, dry white wine, cherry tomatoes, sugar, all-purpose flour, a neutral oil, fresh parsley. Parmesan cheese is optional.
If you don’t purchase thin cut chicken breasts, you’ll need to cut them in half. While the recipe calls for pounding them flat after marinating, I did it before as it seemed less messy. The chicken needs to be pounded to 1/4-inch thickness; be careful not to tear the meat. The chicken breasts are marinated in a mixture of olive oil, lemon juice, garlic, rosemary, salt and pepper for 15 to 30 minutes. When time is up, the pounded chicken breasts are seasoned with salt and pepper and dredged in flour.
In a heavy skillet with the burner set on high, oil is added. When hot, the chicken is sautéed until browned on one side, then flipped. The chicken only needs to cook for 1-1/2 minutes on each side. Once the chicken is sautéed, it’s removed to a dish and kept warm in a low oven. To the skillet you’ll add the wine to deglaze, then add the tomatoes stirring frequently until they start to shrivel and burst open. A little sugar and salt is added and the tomatoes are stirred for another 5 or 10 minutes. The chicken is returned to the pan, garnished with chopped parsley and Parmesan cheese.
What a delicious and light meal. The chicken was moist and tender and the tomatoes were bursting with flavor. I served the dish over orzo which was also a nice, light accompaniment. Overall, a delightful meal.
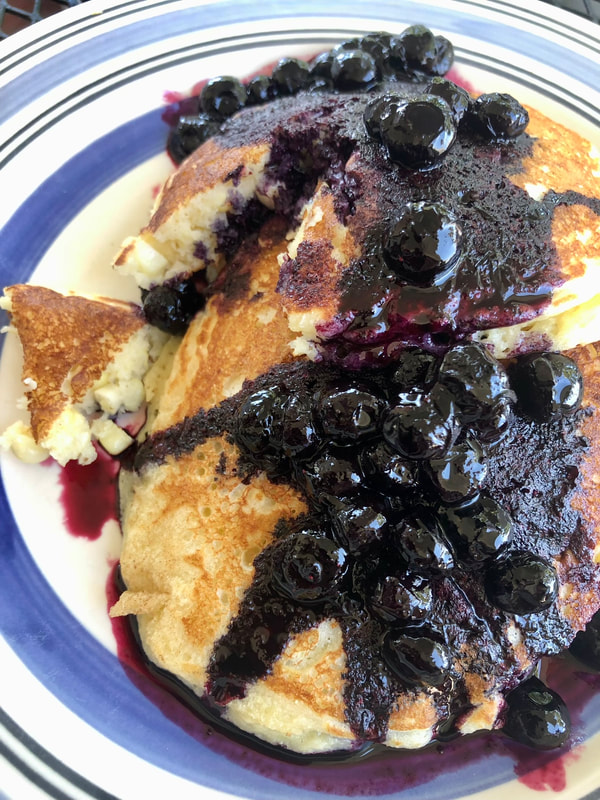
In a recent NYT Cooking Newsletter, it featured a recipe by Lindsey Heuck for Fresh Corn Pancakes with Blueberry Sauce; I was intrigued. The pancakes are made with a combination of all-purpose flour and cornmeal, buttermilk, baking soda, baking powder, kosher salt, eggs, sugar, melted butter and fresh corn kernels. The simple blueberry sauce is made with blueberries, granulated sugar, lemon juice and kosher salt.
Both recipes were very easy to put together. The pancakes cooked up light and fluffy and you could taste the subtle sweetness of the corn. The blueberry sauce was a lovely complement to the pancakes. It was a nice change from my usual buttermilk pancakes.
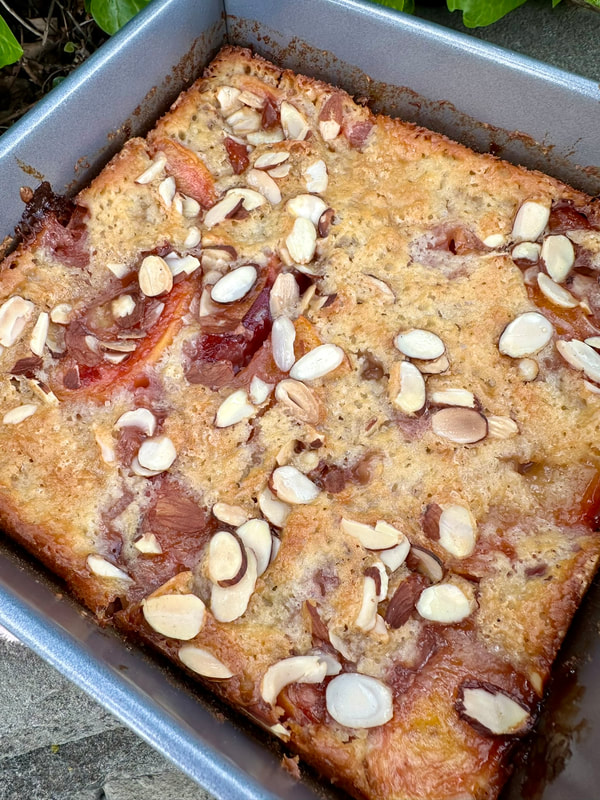
Another recipe from a recent NYT Cooking Newsletter was from Melissa Clark, one of my favorites, for Brown Butter Nectarine Cobbler/Cake. For this recipe you can also use peaches, which is what I used. You’ll also need, granulated sugar, lemon juice, unsalted butter, flour, baking powder, salt, buttermilk, sliced almonds, freshly grated nutmeg and Demerara sugar. This cake bakes in an 8-inch-x8-inch square pan.
After browning the butter, I followed another cook’s suggestion to let the butter chill a bit in the baking pan before adding the batter. This made it easier to spread and keep the butter from seeping into the cake. I also find using a small gravy spoon and placing dollops in several rows made it easier to have an even, level cake. The peaches were sliced (skins on) and placed in a saucepan along with some sugar and lemon juice just to a simmer and removed. I placed the peaches on top, along with toasted almond slices and just a tablespoon of Demerara sugar. The cake bakes for almost an hour. My kitchen smelled wonderful from the scent of freshly baked peaches. I brought it to our beach gathering last night to share with my friends. What a tasty cake! The peaches were ripe, juicy and sweet. Everyone had a cup full of cake, which was the perfect tasting amount. The best thing is that it’s just enough for six to eight people with no tempting leftovers.
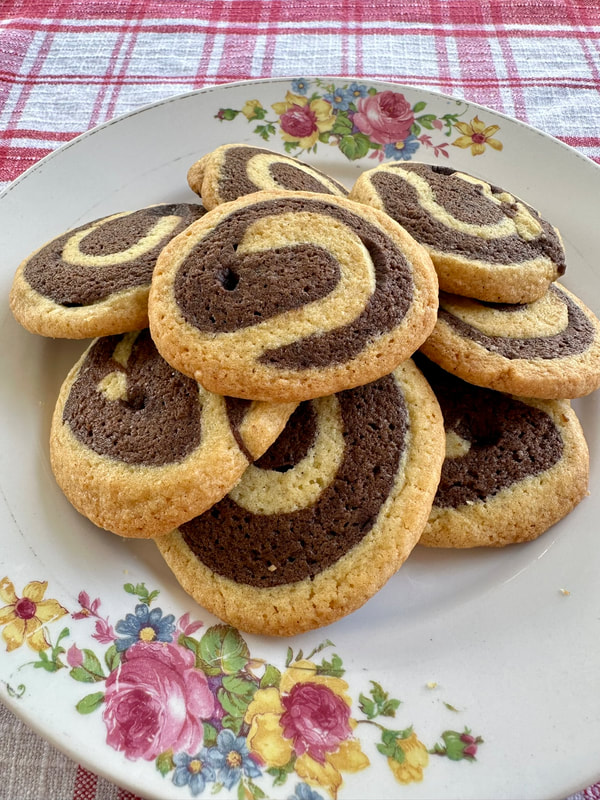
Recently, I tried a Neapolitan Cookie that had chocolate, vanilla and strawberry flavored doughs. While my oldest granddaughter liked it, she preferred a cookie without strawberry. Nana set out to meet her request and found a recipe on the website “Sally’s Baking Recipes” for Pinwheel Cookies. Like the Neapolitan Cookies from “The Vanilla Bean Blog,” this recipe uses one dough and flavors part of it with cocoa powder and espresso. Also, this is a soft cookie due to the addition of an egg yolk. This is a slice an bake cookie that requires to be chilled at certain steps. I found when slicing the cookies, dental floss makes a cleaner and easier slice.
The cookies came out great, but found at 14 minutes they were nicely browned. I do flip the pans in the oven and rotate them for even cooking. I might try baking them for just 13 minutes the next time. My granddaughter comes tomorrow and we’ll see if these cookies meet her expectations. My husband and I enjoyed them as they weren’t too sweet and the crumb was soft as expected.
In a heavy skillet with the burner set on high, oil is added. When hot, the chicken is sautéed until browned on one side, then flipped. The chicken only needs to cook for 1-1/2 minutes on each side. Once the chicken is sautéed, it’s removed to a dish and kept warm in a low oven. To the skillet you’ll add the wine to deglaze, then add the tomatoes stirring frequently until they start to shrivel and burst open. A little sugar and salt is added and the tomatoes are stirred for another 5 or 10 minutes. The chicken is returned to the pan, garnished with chopped parsley and Parmesan cheese.
What a delicious and light meal. The chicken was moist and tender and the tomatoes were bursting with flavor. I served the dish over orzo which was also a nice, light accompaniment. Overall, a delightful meal.
In a recent NYT Cooking Newsletter, it featured a recipe by Lindsey Heuck for Fresh Corn Pancakes with Blueberry Sauce; I was intrigued. The pancakes are made with a combination of all-purpose flour and cornmeal, buttermilk, baking soda, baking powder, kosher salt, eggs, sugar, melted butter and fresh corn kernels. The simple blueberry sauce is made with blueberries, granulated sugar, lemon juice and kosher salt.
Both recipes were very easy to put together. The pancakes cooked up light and fluffy and you could taste the subtle sweetness of the corn. The blueberry sauce was a lovely complement to the pancakes. It was a nice change from my usual buttermilk pancakes.
Another recipe from a recent NYT Cooking Newsletter was from Melissa Clark, one of my favorites, for Brown Butter Nectarine Cobbler/Cake. For this recipe you can also use peaches, which is what I used. You’ll also need, granulated sugar, lemon juice, unsalted butter, flour, baking powder, salt, buttermilk, sliced almonds, freshly grated nutmeg and Demerara sugar. This cake bakes in an 8-inch-x8-inch square pan.
After browning the butter, I followed another cook’s suggestion to let the butter chill a bit in the baking pan before adding the batter. This made it easier to spread and keep the butter from seeping into the cake. I also find using a small gravy spoon and placing dollops in several rows made it easier to have an even, level cake. The peaches were sliced (skins on) and placed in a saucepan along with some sugar and lemon juice just to a simmer and removed. I placed the peaches on top, along with toasted almond slices and just a tablespoon of Demerara sugar. The cake bakes for almost an hour. My kitchen smelled wonderful from the scent of freshly baked peaches. I brought it to our beach gathering last night to share with my friends. What a tasty cake! The peaches were ripe, juicy and sweet. Everyone had a cup full of cake, which was the perfect tasting amount. The best thing is that it’s just enough for six to eight people with no tempting leftovers.
Recently, I tried a Neapolitan Cookie that had chocolate, vanilla and strawberry flavored doughs. While my oldest granddaughter liked it, she preferred a cookie without strawberry. Nana set out to meet her request and found a recipe on the website “Sally’s Baking Recipes” for Pinwheel Cookies. Like the Neapolitan Cookies from “The Vanilla Bean Blog,” this recipe uses one dough and flavors part of it with cocoa powder and espresso. Also, this is a soft cookie due to the addition of an egg yolk. This is a slice an bake cookie that requires to be chilled at certain steps. I found when slicing the cookies, dental floss makes a cleaner and easier slice.
The cookies came out great, but found at 14 minutes they were nicely browned. I do flip the pans in the oven and rotate them for even cooking. I might try baking them for just 13 minutes the next time. My granddaughter comes tomorrow and we’ll see if these cookies meet her expectations. My husband and I enjoyed them as they weren’t too sweet and the crumb was soft as expected.
Lemon and Garlic Chicken with Cherry Tomatoes
By Martha Rose Schulman
The New York Times/NYT Cooking, updated July 15, 2024
Total Time: about 1 hour
Prep Time: 5 minutes
Cook Time: 40 minutes, plus 15 minutes marinating
Yield: 4 servings
Ingredients
2 tablespoons extra-virgin olive oil
3 tablespoons lemon juice
2garlic cloves, minced or puréed
1 teaspoon chopped fresh rosemary
Salt and black pepper, to taste
2 boneless skinless chicken breasts
¼cup dry white wine
2 heaped cups cherry tomatoes, about ¾ pound
Pinch of sugar
2tablespoons all-purpose flour or a gluten- free flour such as rice flour or corn flour
2 tablespoons grapeseed, sunflower or canola oil
1 tablespoon chopped flat-leaf parsley
¼ cup grated Parmesan (optional)
Preparation
Tip - Advance preparation: The chicken breasts can be pounded several hours ahead – but don’t marinate them until shortly before cooking – and kept between pieces of plastic in the refrigerator
By Martha Rose Schulman
The New York Times/NYT Cooking, updated July 15, 2024
Total Time: about 1 hour
Prep Time: 5 minutes
Cook Time: 40 minutes, plus 15 minutes marinating
Yield: 4 servings
Ingredients
2 tablespoons extra-virgin olive oil
3 tablespoons lemon juice
2garlic cloves, minced or puréed
1 teaspoon chopped fresh rosemary
Salt and black pepper, to taste
2 boneless skinless chicken breasts
¼cup dry white wine
2 heaped cups cherry tomatoes, about ¾ pound
Pinch of sugar
2tablespoons all-purpose flour or a gluten- free flour such as rice flour or corn flour
2 tablespoons grapeseed, sunflower or canola oil
1 tablespoon chopped flat-leaf parsley
¼ cup grated Parmesan (optional)
Preparation
- Stir together the olive oil, lemon juice, garlic, rosemary, and salt and pepper in a large bowl. Cut each chicken breast into 2 equal pieces (3 if they weigh 12 ounces or more) and place in the bowl. Stir together and refrigerate 15 to 30 minutes.
- Remove chicken from marinade and pat dry with paper towels. (Discard marinade.) Place two sheets of plastic wrap (1 large sheet if you have extra-wide wrap) on your work surface, overlapping slightly, to make 1 wide sheet, and brush lightly with olive oil. Place a piece of chicken in the middle of plastic sheet and brush lightly with oil. Cover the chicken with another wide layer of plastic wrap. Working from the center to the outside, pound chicken breast with the flat side of a meat tenderizer or rolling pin until about ¼ inch thick. (Don’t pound too hard or you’ll tear the meat. If that happens, it won’t be the end of the world, you’ll just have a few pieces to cook.) Repeat with the remaining chicken breast pieces.
- Season the pounded chicken breasts with salt and pepper on one side only. Dredge lightly in the flour on all sides (you will not use all of it) and tap the breasts to remove excess.
- Turn oven on low. Heat a wide, heavy skillet over high and add oil. When oil is hot, place one or two pieces of chicken in the pan, however many will fit without crowding. Cook for 1½ minutes, until bottom is browned in spots. Turnover and brown other side, about 1½ minutes. (Do not overcook or chicken will be dry.) Transfer to a platter or sheet pan and keep warm in the oven. If there is more than a tablespoon of fat in the pan, pour some off into a jar or bowl.
- Turn heat on burner down to medium-high. Add wine to pan and stir with a wooden spoon to deglaze. Add cherry tomatoes and cook, stirring often or tossing in the pan, until they begin to shrivel and burst. Add sugar and salt and pepper to taste and continue to cook, tossing the tomatoes in the pan and stirring often, for 5 to 10 minutes, until tomatoes have collapsed but are still intact. Top chicken breasts with the tomatoes, sprinkle with parsley and with Parmesan if using, and serve.
Tip - Advance preparation: The chicken breasts can be pounded several hours ahead – but don’t marinate them until shortly before cooking – and kept between pieces of plastic in the refrigerator
Fresh Corn Pancakes with Blueberry Sauce
By Lidey Heuck
The New York Times/NYT Cooking
Total Time: 45 minutes
Prep Time: 10 minutes
Cook Time: 35 minutes
Yield: 4 servings
Ingredients
For the Blueberry Sauce
1 pint (2 cups) fresh blueberries
¼ cup/50 grams granulated sugar
Juice of one lemon (about 3 tablespoons)
Pinch of kosher salt
For the Pancakes
1 cup/130 grams all-purpose flour
1 cup/140 grams medium-grind cornmeal
2 teaspoons baking powder
½ teaspoon baking soda
1½ teaspoons kosher salt (such as Diamond Crystal)
1½ cups/360 milliliters buttermilk, shaken
2 large eggs, beaten
¼ cup/50 grams granulated sugar
2tablespoons melted unsalted butter, plus more for frying
1 cup fresh corn kernels (from 2 ears)
Maple syrup, for serving (optional)
Lemon zest, for serving (optional)
Preparation
- Make the blueberry sauce: Combine the blueberries, sugar, lemon juice and salt in a medium saucepan. Heat over medium-high until the liquid in the pan comes to a simmer, then reduce the heat to medium-low and cook, stirring often, until the berries release their juices and the liquid in the pan reduces and thickens slightly, 8 to 11 minutes. You should have about 1 cup of sauce. Set aside to cool while you make the pancakes.
- Prepare the pancakes: Turn the oven to 200 degrees and place an ovenproof dish or platter in the oven.
- In a large bowl, whisk together the flour, cornmeal, baking powder, baking soda and salt. In a separate, medium bowl or liquid measuring cup, combine the buttermilk, eggs, sugar and butter and whisk until smooth.
- Add the wet ingredients to the dry ingredients, and mix until just combined. Gently fold the corn kernels into the batter.
- On a cast-iron griddle or in a 12-inch skillet, heat ½ tablespoon butter over medium. Scoop ⅓ cup pancake batter onto one side of the skillet and spread lightly into an even circle with the bottom of the measuring cup. Repeat to form two more pancakes (or more if using a large griddle). Cook for about 2 minutes, until bubbles form on the pancakes and the bottoms are golden brown, lowering the heat if the pancakes begin browning too quickly, then flip the pancakes and cook for another minute.
- Transfer the cooked pancakes to the platter in the oven and repeat this process with the remaining batter, adding more butter to the pan as needed. Serve warm with the blueberry sauce, maple syrup and lemon zest, if desired.
Brown Butter Nectarine Cobbler/Cake
“A Cobbler That Gives Fruit Real Support,”
by Melissa Clark, The New York Times/NYT Cooking
July 22, 2011
Total Time: 1 hour, 15 minutes
Cook Time: 50 to 55 minutes
Servings: 6 to 8
Ingredients
3 cups fresh nectarines or peaches in ½-inch slices, or a combination about pound
5 ounces sugar (about ¾ cup)
1 teaspoon lemon juice
4 tablespoons unsalted butter
3 ounces flour (about ¾ cup)
1½ teaspoons baking powder
⅛ teaspoon salt
¾ cup buttermilk
¼ cup sliced almonds
¼ teaspoon freshly grated nutmeg
2 tablespoons Demerara sugar
Preparation
- Heat the oven to 350 degrees. In a saucepan over medium heat, combine the fruit slices, ¼ cup sugar and lemon juice. Stirring constantly, bring the mixture to a simmer, then take the pan off the heat.
- In a small saucepan over medium heat, melt the butter and cook, swirling the pan occasionally, until it smells very nutty, turns golden, and flecks of dark brown appear, 2 to 3 minutes. Pour the brown butter into an 8-inch-by-8-inch baking dish.
- In a mixing bowl, combine the flour, remaining ½ cup sugar, baking powder and salt. Pour the buttermilk into the dry ingredients and mix just until the dry ingredients are moistened. Scrape the batter on top of the brown butter, use a spatula to even out the batter but be careful not to mix it into the butter. Scatter the nectarine slices and juice on top of the batter without stirring. Sprinkle with the almonds, nutmeg and Demerara sugar. Bake until golden brown, 50 to 55 minutes. Transfer the pan to a wire rack to cool. Serve warm.
Pinwheel Cookies
From the website “Sally’s Baking Addiction”
Prep Time: 4 hours, 15 minutes (includes chilling)
Cook Time: 15 minutes
Total Time: 4 hours, 35 minutes
Yield: 28 cookies
“These buttery slice-and-bake pinwheel cookies are a delicious (and beautiful!) swirl of chocolate and vanilla, which start with 1 basic cookie dough. For best success, watch the video tutorial and read through the recipe and Notes before starting. I also have a troubleshooting section above.”
Ingredients
Base Cookie Dough
2 and 2/3 cups (333g) all-purpose flour (spooned & leveled)
3/4 teaspoon baking powder
1/2 teaspoon salt
1 cup (16 Tbsp; 226g) unsalted butter, softened to room temperature
1 cup (200g) granulated sugar
1 large egg + 1 egg yolk, at room temperature
1 and 1/2 teaspoons pure vanilla extract
For the Chocolate Dough
2 Tablespoons (10g) unsweetened natural or Dutch-process cocoa powder
1 Tablespoon (15ml) milk
optional: 1/2 teaspoon espresso powder
Optional for Dipping
6 ounces (170g) white, semi-sweet, or dark chocolate, finely chopped (see Note)
Optional: sprinkles
Instructions
- Make the dough: Whisk the flour, baking powder, and salt together in a medium bowl. Set aside.
- In a large bowl using a hand mixer or a stand mixer fitted with a paddle attachment, beat the butter and granulated sugar together on medium-high speed until creamed, about 2 minutes. Scrape down the sides and up the bottom of the bowl as needed. Add the egg, egg yolk, and vanilla extract and beat on high speed until combined, about 1 minute. Scrape down the sides and up the bottom of the bowl and beat again as needed to combine.
- Add the flour mixture to the wet ingredients and mix on low speed until combined. Dough will be thick and sticky. Remove from the mixing bowl—no need to rinse out the mixing bowl.
- Divide the dough in half: You should have a little less than 2 lbs. of dough, or somewhere between 800–900g. Divide the dough in half. Note: It’s ok if the portions aren’t exactly half. If one half is slightly smaller, use that one for the chocolate dough.
- Make the chocolate dough: Place half of the dough back into the mixing bowl. Add the cocoa powder, milk, and espresso powder (if using). Beat on low speed until dough is combined.
- Shape & chill for 60–90 minutes: The doughs are sticky, so just do your best in this step. Place both doughs on a lightly floured work surface. (Tip: I like to use cocoa powder as my “flour” for handling/rolling the chocolate dough.) With lightly floured hands, carefully form each dough into a 1-inch-thick rectangle block, about 4×5 inches in size. Wrap both dough blocks up in plastic wrap, parchment paper, or aluminum foil. Refrigerate for 60–90 minutes. The *key* is to only refrigerate until the dough is less sticky, but still pliable enough to bend and shape. Chilling any longer will make it difficult to roll together. If you need to chill it for longer than 90 minutes, make sure you let it sit at room temperature for 15–30 minutes before continuing with the next step.
- Roll out the doughs: Remove vanilla dough from the refrigerator and unwrap. Keep chocolate dough in the refrigerator. Lightly flour a piece of parchment paper. Note that I like to place the parchment paper on top of a silicone baking mat to prevent it from sliding all over the counter, or you can tape it down. (Do not roll the doughs directly on the counter because you may have a hard time lifting/transferring them.) Using a lightly floured rolling pin, begin rolling out the vanilla dough. Flip the dough every now and then between rolls to ensure it’s not sticking to the parchment. Roll out to an 8×14-inch rectangle, and use your hands to ensure the sides are straight and smooth. The thickness will be between 1/8–1/4 inch. Set the dough aside, and it’s most helpful if you refrigerate the vanilla dough at this time. Pick up the vanilla dough using the parchment paper and place the whole thing in the refrigerator as you roll out the chocolate dough. Lightly dust another piece of parchment paper with flour or cocoa powder. Using a lightly floured (or cocoa powder-ed) rolling pin, roll the chocolate dough out to an 8×14-inch rectangle, or very slightly smaller. Remove vanilla dough from the refrigerator. Carefully peel the chocolate dough off the parchment and do your best to line it up on top of the vanilla dough. Flatten the chocolate dough on top as best you can, gently patting it down to remove any air bubbles between the layers of doughs. Patch any torn chocolate dough pieces back together. And feel free to use a pizza cutter or sharp knife to straighten up any uneven edges.
- Roll into a log: Starting with a long side, tightly roll the 2 doughs together, making sure there are no gaps between them. You can use the parchment paper under the vanilla dough to assist in rolling. Go slowly, and try to roll it as tightly as possible. You can kind of meld the doughs together with your fingers at the beginning to get the roll started. (You can see me do this in the video tutorial below.) If you notice bare or cracked spots of vanilla dough, which usually happens (don’t worry!), just patch it up with your fingers as you go. Doesn’t have to look perfect. Once you have your log of dough, cut it in half, so you have two 7-inch-long dough logs.
- Chill for 2 more hours: Wrap each dough log in plastic wrap, parchment paper, or aluminum foil and refrigerate for 2 more hours and up to 4 days.
- Preheat oven to 350°F (177°C). Line 2 baking sheets with parchment paper or silicone baking mats. Set aside.
- Slice and bake: Slice each log into 14 1/2-inch-thick cookies.
- Arrange cookies about 2 inches apart on the prepared baking sheets—expect these cookies to expand quite a bit in the oven. If the dough got a little soft from working with it, chill the cookies on the baking sheet in the refrigerator for 10 minutes before baking. Bake for 14–15 minutes or until very lightly browned around the edges.
- Remove from the oven and allow cookies to cool on the baking sheet for 5 minutes before transferring to a wire rack to cool completely.
- Optional chocolate dipping: Coarsely chop the chocolate. Melt in a double boiler or the microwave. If using the microwave, stir every 20 seconds until it’s smooth. Dip half of each cooled cookie into the chocolate. Add sprinkles on top of chocolate, if desired. Allow chocolate to completely set at room temperature or in the refrigerator.
- Cookies stay fresh covered at room temperature for 1 week. Refrigerate cookies dipped in chocolate after a few days.
- Make Ahead Instructions: Baked cookies freeze well up to 3 months. Thaw overnight in the refrigerator and bring to room temperature, if desired, before serving. You can shape the cookie doughs into the pinwheel logs and chill in the refrigerator for up to 4 days (see step 9), or freeze for up to 3 months. Thaw overnight in the refrigerator, then continue with step 10.
- Tinting the dough with food coloring: If you want to tint the vanilla dough a color, you absolutely can. After dividing the dough in half, beat a couple drops (depends on how vibrant you want the color) of gel food coloring into the vanilla dough. If you’re skipping the chocolate dough (see Note below), you can tint both doughs (such as 1 dough red and 1 dough green) OR you can leave 1 dough white and tint the other half (such as white/vanilla and red/peppermint--see Note below about adding flavor extract).
- Can I make these without the chocolate/add another flavor? Yes, but you’ll want to tint half of the dough so the pinwheel design shows. (See Note above.) You can keep the flavor of both dough halves vanilla, or add another extract such as peppermint or coconut. If you want the entire dough flavored, go ahead and add 1 teaspoon of your favorite flavor extract when you add the vanilla extract. If you only want to flavor half of the dough, beat 1/2 teaspoon extract into half of the dough before the 1st chill (replace step 5).
- Rolling in Sprinkles or Coarse Sugar: After chilling the logs of dough, roll in 1/2 cup (about 100g) sprinkles or coarse sugar before slicing and baking. If the sprinkles/coarse sugar are not sticking to the dough, use a pastry brush to brush the dough very lightly with a little water, and then try coating again.
- Chocolate for Dipping: The best chocolate for melting and dipping is the “baking chocolate” bars found in the baking aisle of the grocery store. I typically use Bakers or Ghirardelli brands. You can use white, semi-sweet, or dark/bittersweet. Do not use chocolate chips because they contain stabilizers, which prevent them from melting into the correct consistency.