 Donna Walsifer
take a moment...and breathe
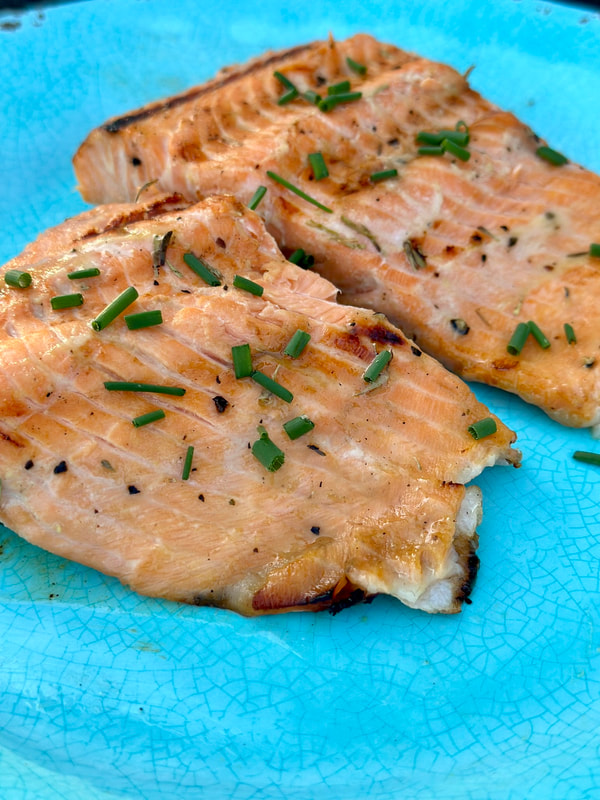
Recently Atlantic Offshore Fishery, in Point Pleasant, NJ, had a special on artic char fish. It’s a cold-water fish that goes between freshwater and salt water. Although both artic char and salmon share similar habitats, artic char lives much further north than salmon. Artic char is a mild fish with a skin that crisps up well when cooked.
I found on “The Spruce Eats” website, a recipe for Grilled Arctic Char with Honey-Dijon Marinade. Besides the fish, you’ll need Dijon mustard, honey, olive oil, garlic, fresh thyme, sea salt, freshly ground black pepper and fresh lemons.
The mustard, honey, oil, garlic, thyme, lemon juice, salt and pepper are combined into a marinade for the fish. Your grill is preheated and the grates oiled. You can do this with grill tongs using several sheets of paper towels folded and dipped into either grape seed, or other high smoke point oil, and coat the grates. The fish begins cooking skin side down for 3 to 5 minutes, turned, and cook until it reaches an internal temperature of 145°.
This was a lovely meal. The fish was light and delicate tasting. The marinade gave the fish a wonderful flavor which wasn’t overpowering. Overall, a delicious meal.
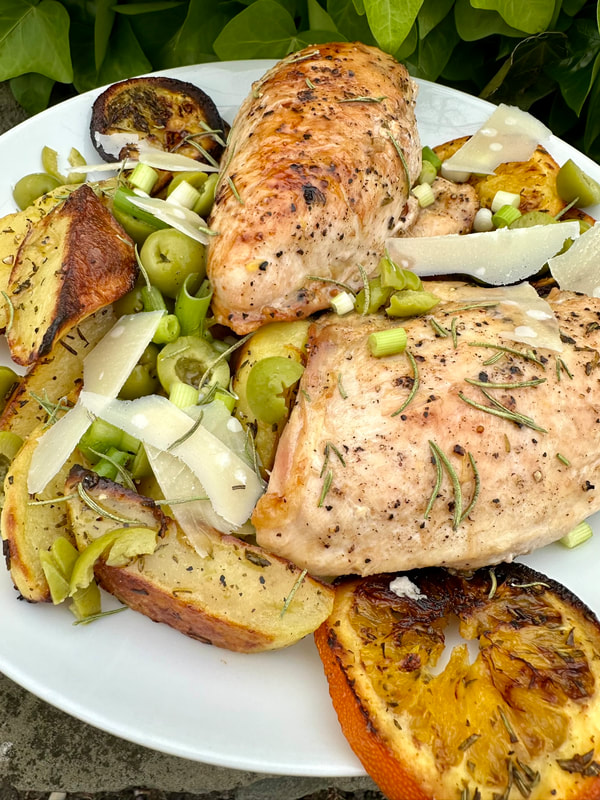
Magazine” for Orange-Rosemary Roast Chicken. For the recipe you’ll need navel oranges, Yukon Gold potatoes, fresh rosemary, olive oil, kosher salt, black pepper, bone-in, skin-on chicken thighs (I substituted bone-in breasts), white balsamic vinegar, honey, Kalamata and Castelvetrano olives, scallions and shaved Parmigiano-Reggiano cheese.
This is a terrific meal that takes approximately 40 minutes to prepare. While your oven preheats, a rimmed baking sheet is placed in the oven. Part of the orange is sliced for cooking and some is squeezed for its juice and set aside. Orange slices, potato wedges, fresh rosemary, olive oil, salt and pepper are tossed together then added to the preheated baking sheet. The potatoes cook for 15 minutes, just shy of browning.
The chicken is seasoned with salt and pepper and is par-cooked in a cast iron skillet with olive oil until the skin is golden brown. The chicken is turned; cooked for four more minutes before added to the baking sheet with the potatoes. The mixture cooks until the potatoes are browned and the meat reaches an internal temperature of 165°. While the chicken bakes, you whisk together vinegar, honey, reserved orange juice, salt, pepper and olive oil. Once the chicken is done, the dressing is drizzled over the chicken and topped with chopped olives, scallions and cheese.
This was a wonderful chicken dish. The combination of ingredients lent a complexity of flavors, from the sweetness of the oranges to the briny taste of the olives. The roasted orange slices on their own were tasty.
Mother’s Day is this coming Sunday and I try to do something special for both my daughter and daughter-in-law. Both have plans with their own families on Sunday, so I thought it would be nice if they could wake up and have a special breakfast. I made a Quiche Lorraine for my daughter. For this recipe, I turned to my 1983 edition of “Betty Crocker Cookbook.” I made this many years ago for a luncheon I had for co-workers and it was rich and delicious. For my daughter-in-law, I’m making a Crust-Less Broccoli Quiche from “Cooking Light Magazine,” July 2003. This version is high in protein, using 4 egg whites and 2 whole eggs, plus it has 5 cups of broccoli florets.
For the Quiche Lorraine you’ll need a prepared pie crust, bacon, Swiss cheese, chopped onion, eggs, half and half, salt, pepper and cayenne pepper. For the crust I followed a recipe by Stella Parks that I found on the “Serious Eats” website for Buttery, Flaky Pie Crust Recipe. To make two pie crusts you’ll need all-purpose flour, sugar, kosher salt, unsalted American-style butter and very cold water. While the ingredients aren’t special, her method of preparing a flaky crust is interesting.
I cut the recipe in half as I just needed one pie shell. When I got down to adding the ice water to the recipe, all thoughts of halving ingredients went out the window and I added the full amount. I had to scramble to save the dough by adding more ingredients. Needless to say, in the future I WILL mise en place my ingredients.
I par-baked the crust before adding the quiche filling. Another thing I didn’t do was to follow the direction and bake the pie crust on a baking sheet. I had to quickly go to my pantry for a baking sheet before messing my oven any further. Once the pie shell baked for 10 minutes, I added the filling and baked until a knife inserted in the middle came out clean. Despite these challenges, I hope my effort yields a tasty product.
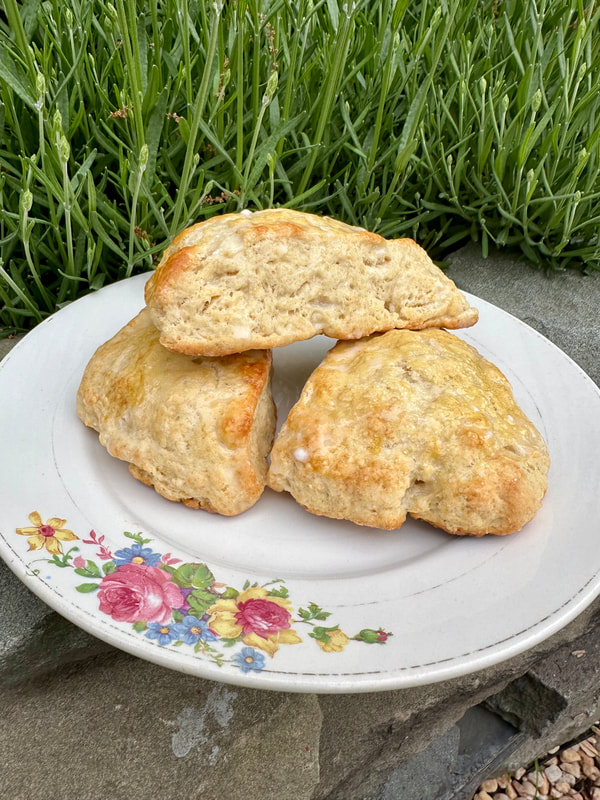
To go along with the quiches, I prepared scones from a recipe from Claridge’s in London, England. I found the recipe on the Food52 website. I chose this recipe as I wanted one that used buttermilk and not heavy cream. Buttermilk will add a bit tang to the flavor and makes for a tender crumb whereas the heavy cream will make the scones denser. The scones received good reviews for flavor, but some felt the baking temperature of 475° was too high. One cook commented that the conversion of 240° Celsius was incorrectly noted at 475°. If you Google for the conversion, it comes to 464°. I baked mine at this temperature directly on a cookie sheet until the exterior was golden, with a dark brown bottom.
When they were finished baking, I couldn’t wait until they were fully cooled to try them. The scones were tender, had a delicate crumb and a subtle sweetness. However, the one my husband and I tried needed a longer baking time. I put the scones back on the baking sheet and returned to the oven and had them bake a little longer with the residual heat. I suggest baking the scones at 400° and bake for 12 minutes; if possible on parchment paper.
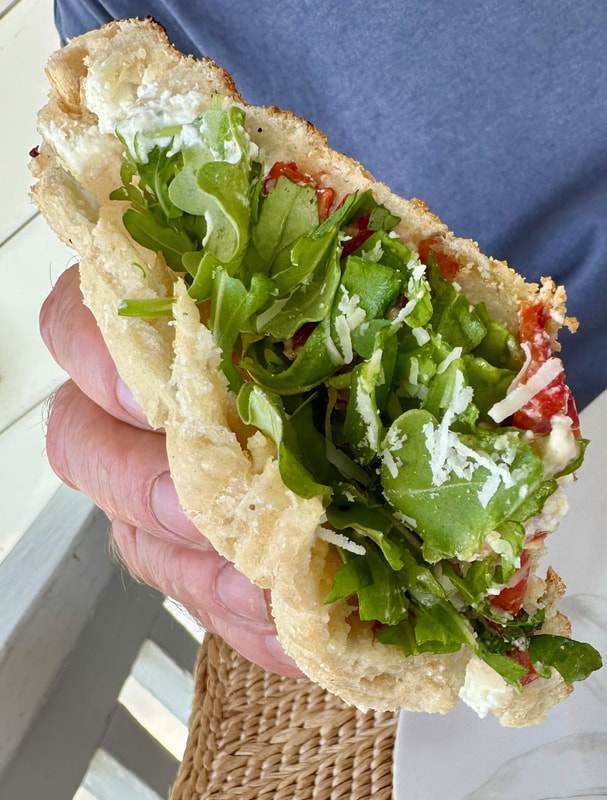
My recent pizza making adventure was a recipe for Sicilian Stuffed Pizza with Ricotta and Arugula. The recipe is by David Tanis, a contributor to The New York Times. Mr. Tanis participated in a seminar in Valelunga-Pratameno on pizza on the island of Sicily. The pizzaiolo, or pizza maker, took pizza dough and baked it on the floor of a stone oven. Once the dough puffed up, it was pulled from the oven and the pizzaiolo, split the dough (it resembles a pita) covered the bottom with sheep’s milk ricotta and a handful of arugula. The top was returned, cut into wedges and eaten like a sandwich. The pizzaiola called it a focaccia.
Mr. Tanis’ recipe also uses ricotta cheese, but he also added anchovy fillets, roasted peppers, basil leaves, salt, pepper, crushed red pepper flakes, pecorino Romano cheese along with the arugula. When I made it for my husband last night, he likened it to a calzone. As my husband isn’t a fan of whole anchovies, I put a light spreading of anchovy paste on the dough along with the recipe’s other ingredients. You can use your own ideas and fill it perhaps with meatballs, sausage, pesto sauce or fresh mozzarella to name a few.
While we enjoyed the stuffed pizza, my husband wasn’t a fan. Maybe this was because it lacked red sauce!!!
This is a terrific meal that takes approximately 40 minutes to prepare. While your oven preheats, a rimmed baking sheet is placed in the oven. Part of the orange is sliced for cooking and some is squeezed for its juice and set aside. Orange slices, potato wedges, fresh rosemary, olive oil, salt and pepper are tossed together then added to the preheated baking sheet. The potatoes cook for 15 minutes, just shy of browning.
The chicken is seasoned with salt and pepper and is par-cooked in a cast iron skillet with olive oil until the skin is golden brown. The chicken is turned; cooked for four more minutes before added to the baking sheet with the potatoes. The mixture cooks until the potatoes are browned and the meat reaches an internal temperature of 165°. While the chicken bakes, you whisk together vinegar, honey, reserved orange juice, salt, pepper and olive oil. Once the chicken is done, the dressing is drizzled over the chicken and topped with chopped olives, scallions and cheese.
This was a wonderful chicken dish. The combination of ingredients lent a complexity of flavors, from the sweetness of the oranges to the briny taste of the olives. The roasted orange slices on their own were tasty.
Mother’s Day is this coming Sunday and I try to do something special for both my daughter and daughter-in-law. Both have plans with their own families on Sunday, so I thought it would be nice if they could wake up and have a special breakfast. I made a Quiche Lorraine for my daughter. For this recipe, I turned to my 1983 edition of “Betty Crocker Cookbook.” I made this many years ago for a luncheon I had for co-workers and it was rich and delicious. For my daughter-in-law, I’m making a Crust-Less Broccoli Quiche from “Cooking Light Magazine,” July 2003. This version is high in protein, using 4 egg whites and 2 whole eggs, plus it has 5 cups of broccoli florets.
For the Quiche Lorraine you’ll need a prepared pie crust, bacon, Swiss cheese, chopped onion, eggs, half and half, salt, pepper and cayenne pepper. For the crust I followed a recipe by Stella Parks that I found on the “Serious Eats” website for Buttery, Flaky Pie Crust Recipe. To make two pie crusts you’ll need all-purpose flour, sugar, kosher salt, unsalted American-style butter and very cold water. While the ingredients aren’t special, her method of preparing a flaky crust is interesting.
I cut the recipe in half as I just needed one pie shell. When I got down to adding the ice water to the recipe, all thoughts of halving ingredients went out the window and I added the full amount. I had to scramble to save the dough by adding more ingredients. Needless to say, in the future I WILL mise en place my ingredients.
I par-baked the crust before adding the quiche filling. Another thing I didn’t do was to follow the direction and bake the pie crust on a baking sheet. I had to quickly go to my pantry for a baking sheet before messing my oven any further. Once the pie shell baked for 10 minutes, I added the filling and baked until a knife inserted in the middle came out clean. Despite these challenges, I hope my effort yields a tasty product.
To go along with the quiches, I prepared scones from a recipe from Claridge’s in London, England. I found the recipe on the Food52 website. I chose this recipe as I wanted one that used buttermilk and not heavy cream. Buttermilk will add a bit tang to the flavor and makes for a tender crumb whereas the heavy cream will make the scones denser. The scones received good reviews for flavor, but some felt the baking temperature of 475° was too high. One cook commented that the conversion of 240° Celsius was incorrectly noted at 475°. If you Google for the conversion, it comes to 464°. I baked mine at this temperature directly on a cookie sheet until the exterior was golden, with a dark brown bottom.
When they were finished baking, I couldn’t wait until they were fully cooled to try them. The scones were tender, had a delicate crumb and a subtle sweetness. However, the one my husband and I tried needed a longer baking time. I put the scones back on the baking sheet and returned to the oven and had them bake a little longer with the residual heat. I suggest baking the scones at 400° and bake for 12 minutes; if possible on parchment paper.
My recent pizza making adventure was a recipe for Sicilian Stuffed Pizza with Ricotta and Arugula. The recipe is by David Tanis, a contributor to The New York Times. Mr. Tanis participated in a seminar in Valelunga-Pratameno on pizza on the island of Sicily. The pizzaiolo, or pizza maker, took pizza dough and baked it on the floor of a stone oven. Once the dough puffed up, it was pulled from the oven and the pizzaiolo, split the dough (it resembles a pita) covered the bottom with sheep’s milk ricotta and a handful of arugula. The top was returned, cut into wedges and eaten like a sandwich. The pizzaiola called it a focaccia.
Mr. Tanis’ recipe also uses ricotta cheese, but he also added anchovy fillets, roasted peppers, basil leaves, salt, pepper, crushed red pepper flakes, pecorino Romano cheese along with the arugula. When I made it for my husband last night, he likened it to a calzone. As my husband isn’t a fan of whole anchovies, I put a light spreading of anchovy paste on the dough along with the recipe’s other ingredients. You can use your own ideas and fill it perhaps with meatballs, sausage, pesto sauce or fresh mozzarella to name a few.
While we enjoyed the stuffed pizza, my husband wasn’t a fan. Maybe this was because it lacked red sauce!!!
Grilled Arctic Char with Honey-Dijon Marinade
By Derrick Riches, “The Spruce Eats”
Updated on 08/30/23
Prep: 10 minutes
Cook: 10 minutes
Total: 20 minutes
Servings: 4
Ingredients
4 (1 1/2-inch thick) skin-on arctic char fillets
1/4 cup (120 milliliters) Dijon mustard
1/4 cup (120 milliliters) honey
2 tablespoons (30 milliliters) olive oil
3 cloves garlic, minced
2 teaspoons fresh thyme
1 teaspoon sea salt
1/2 teaspoon freshly ground pepper
2 1/2 tablespoons freshly squeezed lemon juice
Steps to Make It
- Gather ingredients.
- Rinse fish off in cold water and pat dry with paper towels. Place into a deep glass baking dish.
- Combine mustard, honey, oil, garlic, thyme, lemon juice, salt, and pepper in a small bowl.
- Using a spoon, coat fillets with mixture. Cover dish with plastic wrap and place into refrigerator for 30 to 40 minutes.
- Preheat grill for medium-high heat. Right before placing the fish onto the grill, oil grill grates. This can be done by using a large pair of tongs, folded paper towels, and a high smoke point oil like grapeseed or avocado oils.
- Place fish onto grill, skin side down, and cook for 5 minutes. Discard any extra marinade. Carefully, turn fish and cook for an additional 3 to 5 minutes. It is sometimes easier to use 2 heat-resistant spatulas to turn the fish. One to get underneath and the other to assist with turning.
- When the flesh of the fish no longer appears shiny, flakes easily and reaches an internal temperature of 145 F, it is done. Carefully remove from grill, plate and serve.
Orange-Rosemary Roast Chicken
By Marianne Williams, “Southern Living Magazine”
Published December 31, 2020
Active Time: 20 minutes
Total Time: 45 minutes
Servings: 6
Ingredients
2 medium navel oranges, divided
1 ½ pounds baby Yukon Gold potatoes, cut into ¾-inch-thick wedges
⅓ cup loosely packed fresh rosemary leaves, divided
¼ cup olive oil, divided
2 ¼ teaspoons kosher salt, divided
½ teaspoon black pepper, divided
6 (6- to 7-oz.) bone-in, skin-on chicken thighs
1 tablespoon white balsamic vinegar
¼ teaspoon honey
½ cup mixed Kalamata and Castelvetrano olives, pitted and cut into pieces
⅓ cup thinly sliced scallions
1 ounce Parmigiano-Reggiano cheese, shaved (about ½ cup)
Directions
- Place a large rimmed baking sheet in oven; preheat oven to 425°F. (Do not remove baking sheet while oven preheats.) Thinly slice 1 ½ of the oranges; place in a large bowl. Squeeze juice from remaining orange half into a small bowl to equal 2 tablespoons; set aside. Add potato wedges and ¼ cup of the rosemary leaves to orange slices; stir to combine. Add 1 tablespoon of the oil, ¾ teaspoon of the salt, and ¼ teaspoon of the pepper; toss to coat. Scatter potato mixture evenly over preheated pan; bake until starting to brown, about 15 minutes.
- Meanwhile, season chicken evenly with 1 teaspoon of the salt and remaining ¼ teaspoon pepper. Heat 2 tablespoons of the oil in a large cast-iron skillet over medium-high. Add chicken, skin side down; cook until deep golden brown, 5 to 7 minutes. Turn chicken; continue cooking until golden brown on both sides, about 4 more minutes. Transfer to baking sheet with potato mixture; return to oven. Bake at 425°F until potatoes are browned and tender and a meat thermometer inserted into thickest part of chicken thighs registers 165°F, 12 to 15 more minutes.
- While chicken and potatoes finish baking, whisk together vinegar, honey, 2 tablespoons orange juice, and remaining ½ teaspoon salt and 1 tablespoon oil in a small bowl; set aside. Remove baking sheet from oven; scatter olives, scallions, and shaved cheese over chicken and potatoes. Drizzle with juice mixture; sprinkle with remaining rosemary.
Quiche Lorraine
“Betty Crocker’s Cookbook”
Golden Press/New York
Ninth Printing, 1983
Servings: 6
Pastry for 9-inch One-Crust Pie
12 slices bacon, crisply fried and crumbled
1 cu shredded natural Swiss cheese (about 4 ounces)
½ cup finely chopped onion
4 eggs
2 cups half-and-half
¾ teaspoon salt
¼ teaspoon pepper
1/8 teaspoon cayenne red pepper
Prepare pastry. Sprinkle bacon, cheese and onion in pastry-lined pie plate. Beat eggs slightly; eat in remaining ingredients pour egg mixture into pie plate. Bake uncovered in 425° oven for 15 minutes.
Reduce oven temperature to 300°. Cook uncovered until knife inserted halfway between center and edges comes out clean, about 30 minutes longer. Let stand 10 minutes before cutting.
Buttery, Flaky Pie Crust Recipe
By Stella Parks
From the website “Serious Eats”
Prep: 20 minutes
Cook: 60 minutes
Active: 25 minutes
Chilling Time: 2 hours
Total Time: 3 hours, 20 minutes
Serves: 20
Makes: 2 pies
Ingredients
8 ounces low-protein all-purpose flour, such as Gold Medal Blue Label (1 2/3 cups; 225g), plus more for dusting
1/2-ounce sugar (1 tablespoon; 15g)
1 teaspoon (4g) Diamond Crystal kosher salt; for table salt, use half as much by volume or use the same weight
8 ounces unsalted, American-style butter, straight from the fridge (2 sticks; 225g), cold
4 ounces cold tap water (1/2 cup; 115g)
Directions
Special Equipment
Rolling pin, 9-inch pie pan (preferably tempered glass; see note), pastry brush
Notes
Compared to stoneware or heavy enameled ceramic, tempered-glass pie plates conduct heat quickly and evenly, so the crust bakes up light and crisp, never greasy or soft.
When room temperature exceeds 74°F (23°C), kitchen equipment and pantry staples will act as a heat source to the butter, creating a sticky dough. If it’s warm in your kitchen, take these proactive steps to manage your dough temperature.
See our crash course in mastering pie dough for more tips and troubleshooting.
Make-Ahead and Storage
The dough can be made ahead of time and refrigerated for up to 24 hours before use. To store it for longer than that, the dough can be frozen as a block, rolled, or shaped in a pan. If frozen as a block, dough will still need to rest/relax for at least 2 hours after rolling and shaping.
By Stella Parks
From the website “Serious Eats”
Prep: 20 minutes
Cook: 60 minutes
Active: 25 minutes
Chilling Time: 2 hours
Total Time: 3 hours, 20 minutes
Serves: 20
Makes: 2 pies
Ingredients
8 ounces low-protein all-purpose flour, such as Gold Medal Blue Label (1 2/3 cups; 225g), plus more for dusting
1/2-ounce sugar (1 tablespoon; 15g)
1 teaspoon (4g) Diamond Crystal kosher salt; for table salt, use half as much by volume or use the same weight
8 ounces unsalted, American-style butter, straight from the fridge (2 sticks; 225g), cold
4 ounces cold tap water (1/2 cup; 115g)
Directions
- For the Dough: Whisk flour, sugar, and salt together in a medium bowl. Cut butter into cubes no smaller than 1/2 inch, and toss with flour mixture to break up the pieces. With your fingertips, smash each cube flat—that's it! No rubbing or cutting. Stir in water, then knead dough against sides of the bowl until it comes together in a shaggy ball. Dough temperature should register between 65 and 70°F (18 and 21°C); if not, refrigerate briefly before rolling and folding (see note).
- Make the Layers: On a generously floured work surface, roll dough into a roughly 10- by 15-inch rectangle. Fold the 10-inch sides to the center, then close the newly formed packet like a book. Fold in half once more, bringing the short sides together to create a thick block. Divide in half with a sharp knife or bench scraper. Dough temperature should still be somewhere between 65 and 70°F (18 and 21°C); if not, refrigerate briefly before proceeding (see note).
- For Single-Crusted Pies: Using as much flour as needed, roll one piece into a 14-inch circle; this size allows ample room to line pie plate, with enough overhang to form a generous border. At smaller sizes, dough will fall short, making it difficult to shape edges, and thicker dough will not crisp as intended. Transfer to 9-inch pie plate; dough should be easy to handle, and will not require any special procedures to move. Dust off excess flour with a pastry brush, using it to nestle dough into corners of pan. With scissors or kitchen shears, trim edge so that it overhangs by 1 1/4 inches. Fold overhang over itself to create thick border that sits on top edge of pie plate, not below. Crimp or shape crust as desired. Repeat with remaining dough. Wrap with plastic and refrigerate at least 2 hours and up to overnight. Use as directed in your favorite recipe.
- For a Double-Crusted Pie: Using as much flour as needed, roll one piece into a 14-inch circle; this size allows ample room to line pie plate, with enough overhang to form a generous border. At smaller sizes, dough will fall short, making it difficult to shape edges, and thicker dough will not crisp as intended. Transfer to 9-inch pie plate; dough should be easy to handle, and will not require any special procedures to move. Dust off excess flour with a pastry brush, using it to nestle dough into corners of pan. With scissors or kitchen shears, trim edge so that it overhangs by 1 1/4 inches. For solid top crust, roll remaining dough as before; for lattice-top pie, roll into a 9- by 15-inch rectangle instead. Transfer to a baking sheet or parchment-lined cutting board. (The parchment will prevent dough from absorbing any savory odors from the board.) Wrap both portions in plastic and refrigerate at least 2 hours and up to overnight. Use as directed in your favorite recipe; after filling pie and sealing crusts together, refrigerate 30 minutes before baking.
- For a Blind-Baked Pie: Adjust oven rack to lower-middle position and preheat to 350°F (180°C). Line pie shell that has been chilled for at least 2 hours (as outlined in Step 3) with large sheet of aluminum foil, pressing so it conforms to curves of plate. (A second sheet of foil may be needed for full coverage.) Fill to brim with sugar, transfer to a half sheet pan, and bake until fully set and golden around the edges, 60 to 75 minutes. Fold long sides of foil toward middle, gather short sides, and use both hands to carefully transfer sugar to heat-safe bowl. Let sugar cool to room temperature. If needed, continue baking crust a few minutes more to brown along the bottom.
Special Equipment
Rolling pin, 9-inch pie pan (preferably tempered glass; see note), pastry brush
Notes
Compared to stoneware or heavy enameled ceramic, tempered-glass pie plates conduct heat quickly and evenly, so the crust bakes up light and crisp, never greasy or soft.
When room temperature exceeds 74°F (23°C), kitchen equipment and pantry staples will act as a heat source to the butter, creating a sticky dough. If it’s warm in your kitchen, take these proactive steps to manage your dough temperature.
See our crash course in mastering pie dough for more tips and troubleshooting.
Make-Ahead and Storage
The dough can be made ahead of time and refrigerated for up to 24 hours before use. To store it for longer than that, the dough can be frozen as a block, rolled, or shaped in a pan. If frozen as a block, dough will still need to rest/relax for at least 2 hours after rolling and shaping.
Claridge’s Scones
By “Food52,” March 1, 2019
From the article “More than 210,00 of These Iconic British Scones Get Served Every Year,”
By Hana Asbrink
March 4, 2019
Prep Time: 4 hours, 40 minutes
Cook Time: 12 minutes
Makes: 12 scones
Tools
Standing mixer fitted with the paddle attachment
Rolling pin
2-inch (5-cm.) pastry cutter
Baking tray, lined with baking paper
Pastry brush
Ingredients
11 1/2 ounces (330 g.) plain flour, plus extra for dusting
2 1/4 ounces (60 g.) caster sugar
1 1/2 tablespoons baking powder
1/4 teaspoon salt
3 1/4 ounces cold unsalted butter, cubed
2 1/2 ounces (70 g.) raisins (optional)
3 3/4 ounces (fluid ounce) (110 ml.) buttermilk
3 ounces (fluid ounce) (90 ml.) milk
1 beaten with a pinch of salt, for the egg wash
Directions
Directions
In reading reviews of this recipe on Food52’s webpage, bakers noted that 475° was too hot yield burnt scones. If you Google equivalent of 240 degree Celsius, it’s equivalent t 464°. I suggest baking at 400° for 12 minutes.
By “Food52,” March 1, 2019
From the article “More than 210,00 of These Iconic British Scones Get Served Every Year,”
By Hana Asbrink
March 4, 2019
Prep Time: 4 hours, 40 minutes
Cook Time: 12 minutes
Makes: 12 scones
Tools
Standing mixer fitted with the paddle attachment
Rolling pin
2-inch (5-cm.) pastry cutter
Baking tray, lined with baking paper
Pastry brush
Ingredients
11 1/2 ounces (330 g.) plain flour, plus extra for dusting
2 1/4 ounces (60 g.) caster sugar
1 1/2 tablespoons baking powder
1/4 teaspoon salt
3 1/4 ounces cold unsalted butter, cubed
2 1/2 ounces (70 g.) raisins (optional)
3 3/4 ounces (fluid ounce) (110 ml.) buttermilk
3 ounces (fluid ounce) (90 ml.) milk
1 beaten with a pinch of salt, for the egg wash
Directions
Directions
- In a large bowl, combine the flour, sugar, baking powder and salt, then add the butter and rub into the flour mixture with your fingers until you have a fine crumb (you could also pulse these five to six times in a food processor to achieve the same sandy texture, but it’s almost as fast to work by hand). If you’re making raisin scones, stir the raisins in now. Transfer to a smaller container, cover and leave to rest in the refrigerator overnight, or until thoroughly chilled.
- The next morning, preheat the oven to 475 degrees Fahrenheit (240 degrees Celsius), Gas Mark 9.
- Transfer the butter and flour mixture to the standing mixer. Slowly mix in the buttermilk and milk until the dough comes together.
- On a lightly floured surface, roll out the dough to form a circle, about 8 inches (21 cm.) in diameter and 3/4 inch (2 cm.) thick, then cut out 12 scones using the pastry cutter. Transfer the scones to the prepared baking tray.
- Using a pastry brush, carefully brush the tops with the egg wash. We like to let our scones sit out for 20 minutes at room temperature to give the baking powder a chance to activate before we bake them.
- Bake until evenly golden, about 12–13 minutes. Leave to cool for 5 minutes, then serve warm.
- To serve: We strongly suggest serving these only on the day of baking. Leftover scones can be frozen and will remain good for up to three weeks: as needed, defrost completely, then reheat in a preheated 350-degree Fahrenheit (180 degree Celsius), Gas Mark 4 oven for 3 minutes.
In reading reviews of this recipe on Food52’s webpage, bakers noted that 475° was too hot yield burnt scones. If you Google equivalent of 240 degree Celsius, it’s equivalent t 464°. I suggest baking at 400° for 12 minutes.
Sicilian Stuffed Pizza with Ricotta and Arugula
“When Pizza is More Than Just a Pie,” by David Tanis
The New York Time, June 6, 2018
Total Time: 45 minutes
Servings: 2 to 4
Ingredients
Fine semolina, for dusting
8 ounces pizza dough (store-bought or homemade), rolled in a ball and held at room temperature (see recipe)
8 ounces very fresh ricotta, drained
Extra-virgin olive oil
6 to 8anchovy fillets, rinsed and blotted
A few strips of roasted sweet pepper
A few basil leaves
Salt and pepper
Crushed red-pepper flakes
¼ cup grated aged pecorino cheese, such as pepato
2 large handfuls arugula, preferably not too tender
Preparation
- Turn oven to 450 degrees and put a pizza stone on the middle shelf to heat for 20 to 30 minutes. (Alternatively, use a heavy-duty baking sheet.)
- Sprinkle a clean work surface lightly with semolina. Place the pizza dough on top and push down with your hands, flattening it. Dust lightly with semolina, if it seems sticky. Press down and outward with fingers to a diameter of about 8 inches. (You may use a rolling pin if you prefer.)
- Sprinkle more semolina beneath the dough so it will easily slide as you begin to stretch it in all directions to a diameter of about 10 inches.
- To transfer the dough to the oven, slide a pizza peel (or something similar, like the steel, rimless bottom of a tart pan or a stiff piece of cardboard) under the dough. There should be sufficient semolina on the bottom of the dough to keep it from stickling to the peel.
- Transport the dough to the oven and quickly slip it from the peel onto the pizza stone. In a few minutes it will begin to puff. Let it bake for 8 to 10 minutes, until nicely browned and well puffed. Remove from oven and place on a cutting board.
- Use a knife to cut all the way around at the edge, separating the top half from the bottom. Add the fillings: Spoon the ricotta in blobs to cover the surface, then smooth briefly. Drizzle ricotta with 3 tablespoons olive oil and arrange randomly the anchovy, pepper strips and basil. Season lightly with salt, pepper and crushed red pepper to taste.
- Cover everything with pecorino and arugula and put the top back on the pie. Use a large knife to cut the pie in half, then in wedges of whatever size you with. Serve immediately.