 Donna Walsifer
the mission continues
Back in 2016, I was posting recipes that I prepared on my Facebook page. My daughter thought that instead of posting on Facebook, I should have a website, hence for Mother’s Day 2016 “Donna’s Daily Dish” was created. I can’t believe that eight years has passed. Donna’s Daily Dish also has an Instagram and Bio Link page promoting family friendly meals. My mission with this website was to inspire people to prepare easy, everyday meals at home. Some may be a little more involved, but those are recipes you’ll prepare on a weekend or special occasion.
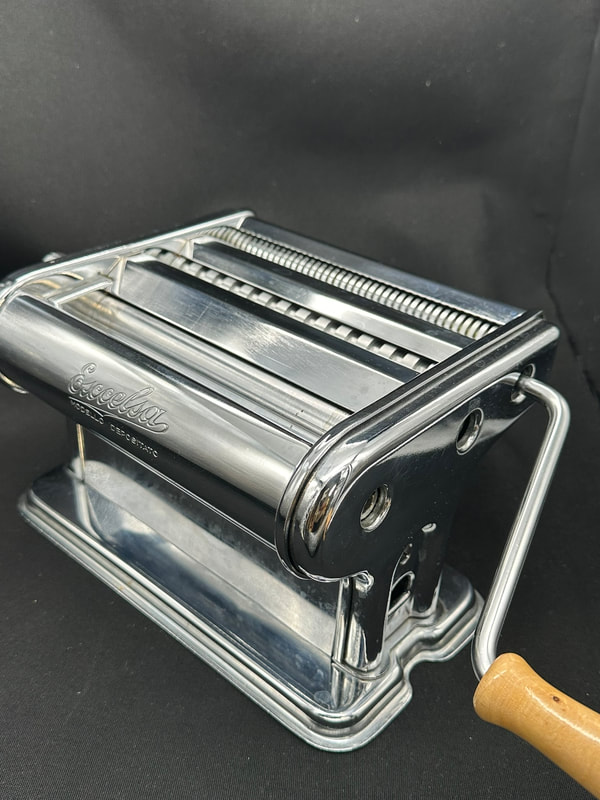
Recently, I decided to make fresh pasta. I have a manual pasta machine that my late aunt purchased for my mother to make ribbon cookies. I looked through my cook books by Marcella Hazan and Arthur Schwartz for recipes, but settled on a recipe by Lidia Bastianich. For her recipe you’ll need all-purpose flour, eggs, extra-virgin olive oil and ice water.
Recently, I decided to make fresh pasta. I have a manual pasta machine that my late aunt purchased for my mother to make ribbon cookies. I looked through my cook books by Marcella Hazan and Arthur Schwartz for recipes, but settled on a recipe by Lidia Bastianich. For her recipe you’ll need all-purpose flour, eggs, extra-virgin olive oil and ice water.
The dough is made in a food processor which makes the prep very easy. Flour is placed in the food processor and pulsed several times to aerate. Eggs, oil and ice water are blended in a measuring cup. With the machine running, the mixture is slowly drizzled through the feed tube until a soft ball is formed. The dough is removed, covered and rests for 30 minutes. If you have a pasta machine, it’s very easy to roll out pasta sheets which can then be cut into fettuccine, linguine or spaghetti. Mine is over 40 years old and has spaghetti and fettuccine rollers. If you don’t have a pasta machine but a KitchenAid mixer, you can purchase a pasta roller attachment. If you don’t have either, you can use a rolling pin to roll out the dough. If you go on YouTube and search “rolling out pasta by hand,” you will find a variety of instructional videos. A few years ago, my son turned me on to “Pasta Grannies” Instagram page, it was created by Vicky Bennison documenting handmade pasta in Italy.
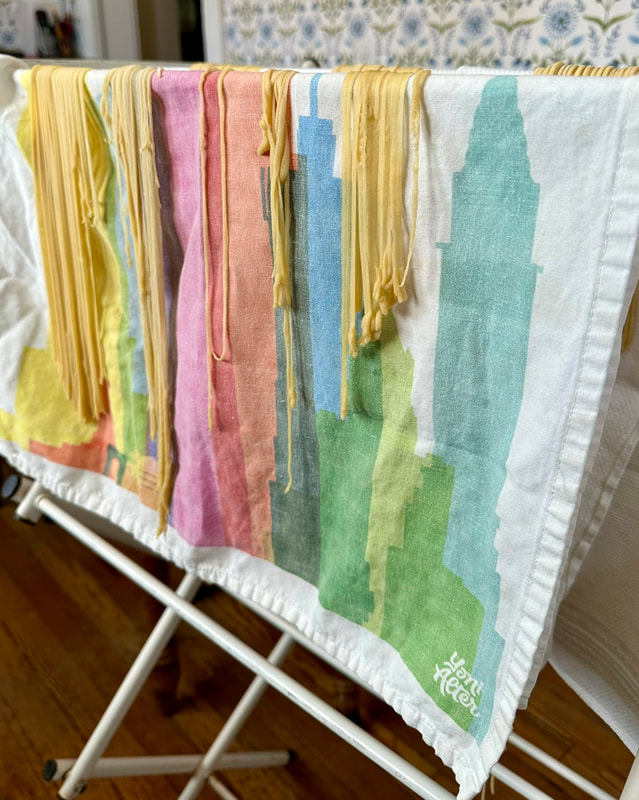
I’m including a link on how to make pasta using a pasta machine entitled “Homemade Fresh Pasta with Marcato Atlas 150 Classic - Video tutorial. I love the Marcato Tacapasta drying rack. I don’t know if I can justify spending $40-60 when I can use my folding clothes dryer rack. My husband promises to make one for me.
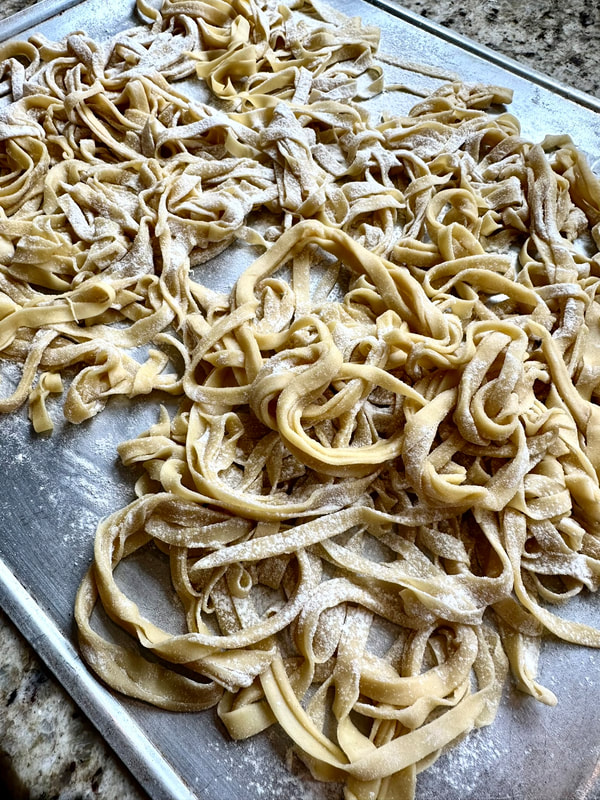
Whether rolling out the dough with a machine or by hand, cut your dough into quarters and keep covered. I would also very lightly flour the dough to avoid the pasta sticking to itself while going through the flattening rollers and cutting the pasta into fettuccine or spaghetti. After the second batch, I also realized that I didn’t have to take the dough down to its thinnest setting. My pasta seemed to come out better if wasn’t too thin. All of this you’ll learn with each batch you make.
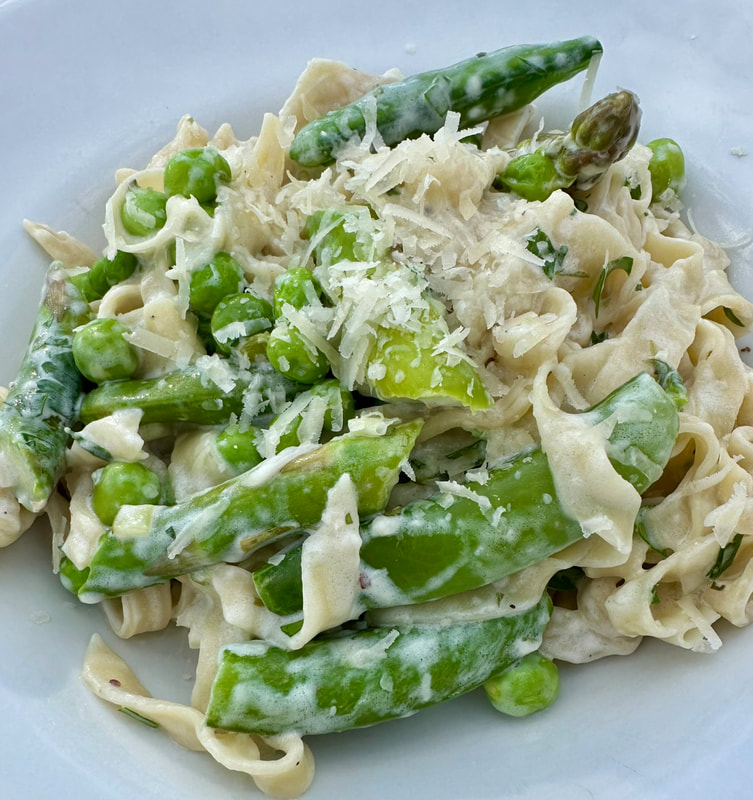
The fresh pasta dough tastes lighter than packaged, cooks in 2 to 4 minutes and you can make it about an hour and change. For the first batch I made fettuccine and prepared Melissa Clark’s recipe for Pasta Primavera with Asparagus and Peas. For the recipe you’ll need sugar snap peas, asparagus, unsalted butter, fresh English peas, spring onion, fresh garlic, sea salt, freshly ground black pepper, fettuccine or tagliatelle, Parmigiano-Reggiano cheese, crème fraîche or whole milk Greek yogurt, fresh parsley and fresh tarragon. Finding fresh tarragon can be difficult so I substituted dried. I also used whole milk Greek yogurt.
While the water was boiling, I prepped my vegetables which meant trimming the sugar snap peas, snapping the ends off the asparagus and cutting them into 1/4-inch pieces (leave the tips whole), shelling the peas and thinly slicing the white part of the onions. I also finely chopped the garlic, grated the Parmesan cheese, measured out the Greek yogurt and finely chopped the parsley and measured out 1 teaspoon of dried tarragon for the fresh. With everything prepped, it would make it easier to finish the dish.
Butter is melted in a large skillet in which the snap peas, asparagus, peas and onions are cooked until slightly tender. The garlic is added along with salt and pepper and set aside. The fresh pasta was done in several minutes. I drained the pasta, returned to the pot and added the sautéed vegetables. Once that was tossed gently, I added the cheese, yogurt and herbs.
This was a wonderful spring pasta dish. The homemade pasta was fabulous, so light tasting, a delightful change. The vegetables along with the cheese, yogurt and herbs made for a tasty meal. Alas, no red sauce, but we heartily ate this dish.
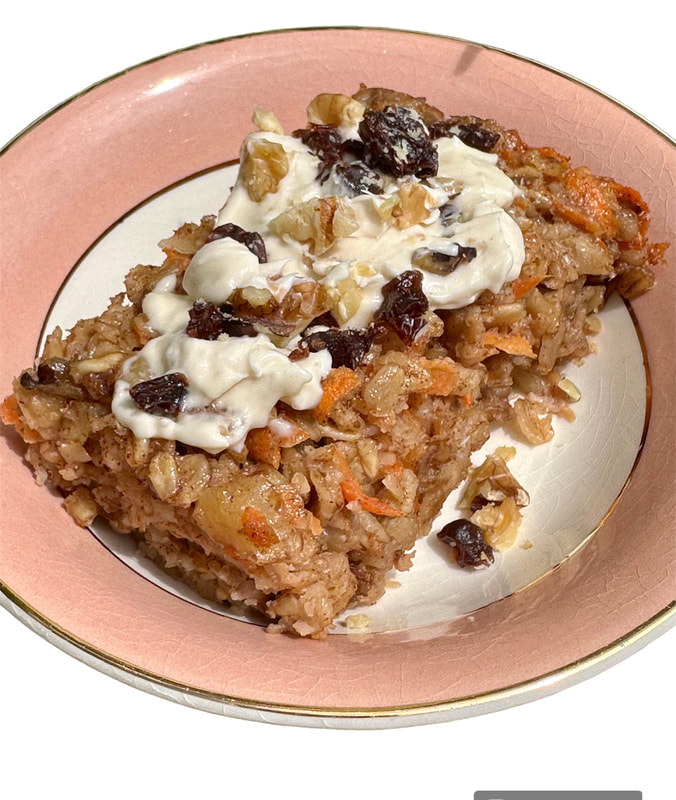
A few weeks ago, my daughter told me she made carrot cake baked oatmeal. I love carrot cake as does my husband. I searched the internet and found a recipe. I incorporated a Maple Cream Cheese Glaze from another baked oatmeal carrot cake recipe. The initial recipe I made was from the website “Ahead of Thyme.” For their recipe you’ll need either cooking spray or butter to coat an 8-inch square baking pan, old fashioned oats, cinnamon, baking powder, salt, grated carrots, walnuts, milk, maple syrup and vanilla. For the maple glaze you’ll need cream cheese, pure maple syrup and vanilla extract.
While the process is the same as the other two baked oatmeal recipes I’ve tried, this one had less milk, 1-1/2 cups versus 2 and used maple syrup instead of brown sugar as a sweetener. The recommended baking time was 40 to 45 minutes.
After making the carrot cake baked oatmeal, both my husband and I found it a bit dry. I recently retested the recipe and bumped the milk up to two cups and checked it after 30 minutes and rechecked at 35, which was perfect. Besides making sure the top was golden, I inserted a knife in the center to make sure it came out clean, indicating the filling was set.
This time the oatmeal was moister. I chose “Ahead of Thyme’s” recipe as its ingredients were close to my carrot cake recipe. The Maple Cream Cheese frosting was delightful. My carrot cake frosting uses confectioners’ sugar as the sweetener, the use of maple syrup added another layer of flavor and a gentle sweetness which enhanced the oatmeal. Although I used a hand mixer to make the glaze, you may want to thin it a bit with a touch of milk so that you get the right consistency to drizzle.
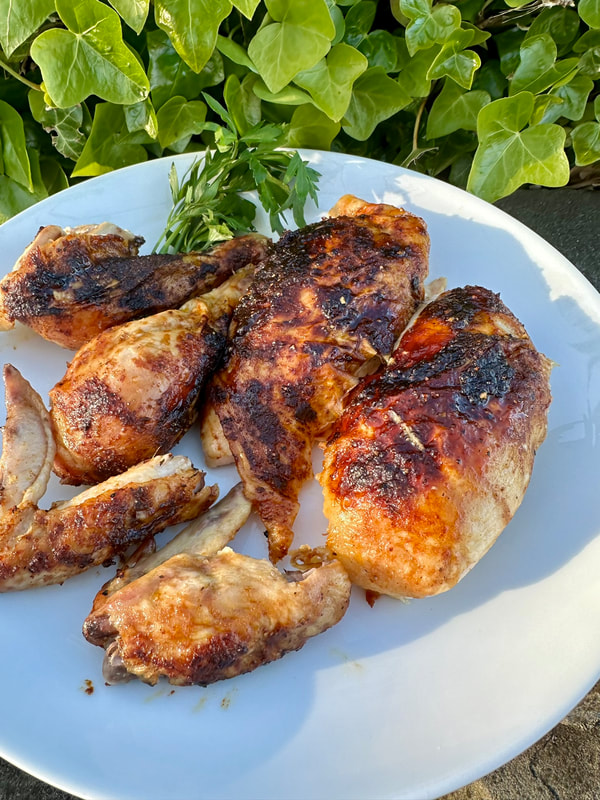
Over the weekend I prepared a sheet pan recipe for BBQ Rub Roasted Chickens with Potatoes and Carrots. You can never have enough chicken recipes in your cooking arsenal and this one is one you should have. I clipped this recipe from my “Southern Living Magazine” back in February 2017. For the recipe you’ll need dark brown sugar, smoked paprika, ground cumin, garlic powder, onion powder, kosher salt, black pepper, whole chickens, olive oil, small red potatoes, baby carrots and fresh flat leaf parsley.
The dry rub consists of dry spices along with salt and pepper that are blended together. The chickens are patted dry with paper towels and olive oil is rubbed over the entire chicken. A teaspoon of the rub is sprinkled inside the chicken with the balance rubbed on the exterior. The potatoes are cut in half and with the carrots tossed with olive oil and seasoned with salt and pepper. The vegetables are placed on the sheet pan with the chickens placed on top. They roast in a preheated 375° oven for 75 minutes or until a meat thermometer registers an internal temperature of 165°. The chicken rested for 10 minutes before my husband carved the meat.
What a delicious, tasty, flavorful chicken! My husband absolutely loved it as he devoured both chicken legs and a wing. The meat was moist and tender. The combination of spices lent a delightful flavor to the meat. For the summer, I can forego roasting in the oven and spatchcock the chicken to cook on the cooking or use my grill’s rotisserie attachment. A keeper and perfect summertime recipe.
I’m including a link on how to make pasta using a pasta machine entitled “Homemade Fresh Pasta with Marcato Atlas 150 Classic - Video tutorial. I love the Marcato Tacapasta drying rack. I don’t know if I can justify spending $40-60 when I can use my folding clothes dryer rack. My husband promises to make one for me.
Whether rolling out the dough with a machine or by hand, cut your dough into quarters and keep covered. I would also very lightly flour the dough to avoid the pasta sticking to itself while going through the flattening rollers and cutting the pasta into fettuccine or spaghetti. After the second batch, I also realized that I didn’t have to take the dough down to its thinnest setting. My pasta seemed to come out better if wasn’t too thin. All of this you’ll learn with each batch you make.
The fresh pasta dough tastes lighter than packaged, cooks in 2 to 4 minutes and you can make it about an hour and change. For the first batch I made fettuccine and prepared Melissa Clark’s recipe for Pasta Primavera with Asparagus and Peas. For the recipe you’ll need sugar snap peas, asparagus, unsalted butter, fresh English peas, spring onion, fresh garlic, sea salt, freshly ground black pepper, fettuccine or tagliatelle, Parmigiano-Reggiano cheese, crème fraîche or whole milk Greek yogurt, fresh parsley and fresh tarragon. Finding fresh tarragon can be difficult so I substituted dried. I also used whole milk Greek yogurt.
While the water was boiling, I prepped my vegetables which meant trimming the sugar snap peas, snapping the ends off the asparagus and cutting them into 1/4-inch pieces (leave the tips whole), shelling the peas and thinly slicing the white part of the onions. I also finely chopped the garlic, grated the Parmesan cheese, measured out the Greek yogurt and finely chopped the parsley and measured out 1 teaspoon of dried tarragon for the fresh. With everything prepped, it would make it easier to finish the dish.
Butter is melted in a large skillet in which the snap peas, asparagus, peas and onions are cooked until slightly tender. The garlic is added along with salt and pepper and set aside. The fresh pasta was done in several minutes. I drained the pasta, returned to the pot and added the sautéed vegetables. Once that was tossed gently, I added the cheese, yogurt and herbs.
This was a wonderful spring pasta dish. The homemade pasta was fabulous, so light tasting, a delightful change. The vegetables along with the cheese, yogurt and herbs made for a tasty meal. Alas, no red sauce, but we heartily ate this dish.
A few weeks ago, my daughter told me she made carrot cake baked oatmeal. I love carrot cake as does my husband. I searched the internet and found a recipe. I incorporated a Maple Cream Cheese Glaze from another baked oatmeal carrot cake recipe. The initial recipe I made was from the website “Ahead of Thyme.” For their recipe you’ll need either cooking spray or butter to coat an 8-inch square baking pan, old fashioned oats, cinnamon, baking powder, salt, grated carrots, walnuts, milk, maple syrup and vanilla. For the maple glaze you’ll need cream cheese, pure maple syrup and vanilla extract.
While the process is the same as the other two baked oatmeal recipes I’ve tried, this one had less milk, 1-1/2 cups versus 2 and used maple syrup instead of brown sugar as a sweetener. The recommended baking time was 40 to 45 minutes.
After making the carrot cake baked oatmeal, both my husband and I found it a bit dry. I recently retested the recipe and bumped the milk up to two cups and checked it after 30 minutes and rechecked at 35, which was perfect. Besides making sure the top was golden, I inserted a knife in the center to make sure it came out clean, indicating the filling was set.
This time the oatmeal was moister. I chose “Ahead of Thyme’s” recipe as its ingredients were close to my carrot cake recipe. The Maple Cream Cheese frosting was delightful. My carrot cake frosting uses confectioners’ sugar as the sweetener, the use of maple syrup added another layer of flavor and a gentle sweetness which enhanced the oatmeal. Although I used a hand mixer to make the glaze, you may want to thin it a bit with a touch of milk so that you get the right consistency to drizzle.
Over the weekend I prepared a sheet pan recipe for BBQ Rub Roasted Chickens with Potatoes and Carrots. You can never have enough chicken recipes in your cooking arsenal and this one is one you should have. I clipped this recipe from my “Southern Living Magazine” back in February 2017. For the recipe you’ll need dark brown sugar, smoked paprika, ground cumin, garlic powder, onion powder, kosher salt, black pepper, whole chickens, olive oil, small red potatoes, baby carrots and fresh flat leaf parsley.
The dry rub consists of dry spices along with salt and pepper that are blended together. The chickens are patted dry with paper towels and olive oil is rubbed over the entire chicken. A teaspoon of the rub is sprinkled inside the chicken with the balance rubbed on the exterior. The potatoes are cut in half and with the carrots tossed with olive oil and seasoned with salt and pepper. The vegetables are placed on the sheet pan with the chickens placed on top. They roast in a preheated 375° oven for 75 minutes or until a meat thermometer registers an internal temperature of 165°. The chicken rested for 10 minutes before my husband carved the meat.
What a delicious, tasty, flavorful chicken! My husband absolutely loved it as he devoured both chicken legs and a wing. The meat was moist and tender. The combination of spices lent a delightful flavor to the meat. For the summer, I can forego roasting in the oven and spatchcock the chicken to cook on the cooking or use my grill’s rotisserie attachment. A keeper and perfect summertime recipe.
Fresh Pasta for Pappardelle/Tagliatelle/Quadrucci/Fuzi/Pasutice/Anolini
By Lidia Bastianich, from the website “Lidia’s Italy”
Makes 1 pound of pasta dough
Ingredients
2 cups all-purpose flour, plus more as needed
2 large eggs
3 tablespoons extra-virgin olive oil
¼ cup ice water, plus more as needed
Directions
Put the flour in a food processor, and pulse to aerate. Combine the eggs, olive oil, and ice water in a spouted measuring cup, and beat with a fork to combine.
With the processor running, add the egg mixture through the feed tube until a dough begins to form around the blade. Process until the dough is soft and springy and forms a loose ball around the blade. (If the dough is too loose to form a ball, add a tablespoon or two more flour; if it is too crumbly, add a little more water.) Turn the dough onto a floured countertop, and knead a few times to bring it together into a ball.
Wrap in plastic wrap and let it rest for 30 minutes at room temperature. Cut the rested dough into four pieces. Roll one piece through a pasta machine on the widest setting to stretch it, fold like a letter, and feed the side of the folded dough where the two ends meet through the machine again. Repeat once more, same as before, to smooth out the dough and create an even rectangle. Repeat with the remaining pieces of dough. Switch to the next-lower setting, and roll each piece through only once. Continue to take the machine down a setting (or two, if the dough rolls through too easily; it depends on your machine) and roll the pieces through until you have four thin pieces about the width of your pasta machine. Cut each piece in half crosswise to get eight pieces.
FOR PAPPARDELLE: Roll the floured pieces up lengthwise, like a cigar, and cut them into 1-inch ribbons. Gently twirl them, and form into loose nests on a floured baking sheet.
FOR TAGLIATELLE: Roll as for pappardelle, but cut into 1/2-inch ribbons.
FOR QUADRUCCI: Make tagliatelle, and then cut crosswise into little squares; use in soups.
FOR PASUTICE: Cut the eight pieces lengthwise into three strips each. Cut across the ribbons on the diagonal at 2-inch intervals to make diamonds. Toss the pasutice with abundant flour, and lay them in a single layer on a floured baking sheet. Cover with a dishcloth, flour the cloth, and layer more pasutice as needed.
FOR FUZI: Make the pasutice diamonds. Starting at one corner of each diamond, roll the piece of dough diagonally around a floured chopstick (or something similar, like a thin-handled wooden spoon the thickness of a large straw) and overlap the ends to make a tube. Press on the overlapping ends to seal, and slide the dough off the chopstick. Spread on a floured baking sheet. (Use two baking sheets, if needed; don’t stack these or you’ll crush them.)
FOR ANOLINI: Mix 11/2 cups fresh ricotta, 1 egg yolk, 1/3 cup freshly grated Grana Padano, 2 tablespoons chopped parsley, and a pinch of salt in a bowl. Roll the pasta into sheets, as described opposite, but don’t cut the sheets in half. Use a 1-inch round cutter to mark as many rounds as possible in half of the sheets, not cutting all the way through the dough. Dollop about 1/2 teaspoon ricotta filling in each of the circles, and wet the edges with your finger dipped in water. Lay the remaining sheets over the top to cover the filling, gently draping and stretching to cover all of the mounds of filling. Use the cutter to cut through both pieces of dough for all of the mounds. Pull away any excess pasta to separate the individual anolini. Press the edges of the circles together to seal, and dust them with flour. Place them on floured baking sheets.
Notes This is the dough I make at home. Simple to prepare and easy to roll out, it keeps well for 2 days tightly wrapped in the refrigerator and 2 months in the freezer. I make all different shapes of pasta with this dough; fettuccine, tagliatelle, quadrucci for soup, and pappardelle, garganelli (fuzi), maltagliati (pasutice). Often, in my nonna Rosa’s kitchen, all the leftover pasta dough was rolled out and cut into varying shapes to be used for soup; we had a potpourri of pasta shapes, and not one little corner of the dough went to waste. Here are instructions on how to cut some of the shapes that are used in some of the recipes in this book, plus a filled pasta you can serve in chicken broth or the Mixed Meat Broth.
Pasta Primavera with Asparagus and Peas
“Fresh Pasta, Made Simply,” By Melissa Clark
The New York Times May 8, 2015
Total Time: 20 minutes
Servings: 4
Ingredients
¼ pound sugar snap peas, stems trimmed
½ pound asparagus, ends snapped
2 tablespoons unsalted butter
¾ cup fresh English peas
¼ cup thinly sliced spring onion, white part only (or use shallot)
2 garlic cloves, finely chopped
½teaspoon fine sea salt, more as needed
Black pepper, more as needed
12 ounces fettuccine or tagliatelle, preferably fresh (see recipe)
⅔ cup grated Parmigiano-Reggiano, at room temperature
½ cup crème fraîche or whole milk Greek yogurt, at room temperature
3 tablespoons finely chopped parsley
1 tablespoon finely chopped tarragon
Preparation
- Bring a large pot of heavily salted water to a boil over medium-high heat.
- While the water is coming to a boil, slice snap peas and asparagus stems into ¼-inch-thick pieces; leave asparagus tips whole.
- Melt butter in a large skillet over medium-high heat. Add snap peas, asparagus, English peas and onion. Cook until vegetables are barely tender (but not too soft or mushy), 3 to 4 minutes. Stir in garlic and cook 1 minute more. Season with salt and pepper; set aside.
- Drop pasta into boiling water and cook until al dente (1 to 3 minutes for fresh pasta, more for dried pasta). Drain well and transfer pasta to a large bowl. Immediately toss pasta with vegetables, Parmigiano-Reggiano, crème fraîche and herbs. Season generously with salt and pepper, if needed.
BBQ Rub Roasted Chickens
with Potatoes and Carrots
“Southern Living Magazine,” Weeknight Dinners
February 17, 2017
Active Time: 15 minutes
Total Time: 1 hour, 30 minutes
Servings: 4
Ingredients
4 tsp. dark brown sugar
1 tbsp. smoked paprika
½ tsp. ground cumin
½ tsp. garlic powder
½ tsp. onion powder
5 tsp. kosher salt, divided (4 tsp. + 1 tsp.)
2-1/2 tsp. black pepper divided (2 tsp. pepper + ½ tsp.)
2 (4- to 5-lb.) whole chickens
3 tbsp. olive oil, divided (2 tbsp. + 1 tbsp.)
1-1/2 lbs. small red potatoes, halved
1 (8-oz.) package baby carrots
1 tbsp. chopped fresh flat-leaf parsley
Directions
- Preheat oven to 375°F. Stir together first 5 ingredients, 4 teaspoon of the salt and 2 teaspoons of the pepper. Remove necks and giblets from chickens and reserve for another use. Pat chickens dry.
- Sprinkle 1 teaspoon brown sugar mixture inside cavity of each chicken. Rub 1 tablespoon olive oil into skin of each chicken. Sprinkle evenly with remaining brown sugar mixture; rub into skin. Tuck wing tips under.
- Toss together potatoes, carrots, remaining 1 tablespoon olive oil, remaining 1 teaspoon salt and remaining ½ teaspoon pepper. Spread potato mixture in a single layer in a 17-x12-inch rimmed baking sheet. Place chicken, breast side up, facing in opposite directions (for even browning), on top of potato mixture.
- Bake in preheated oven until a meat thermometer inserted in thickest portion of thigh registers 165°F, 1 hour to 1 hour 15 minutes. Cover and let stand 10 minutes before slicing. Stir parsley into vegetables.