 Donna Walsifer
what to eat this summer?
Paninis
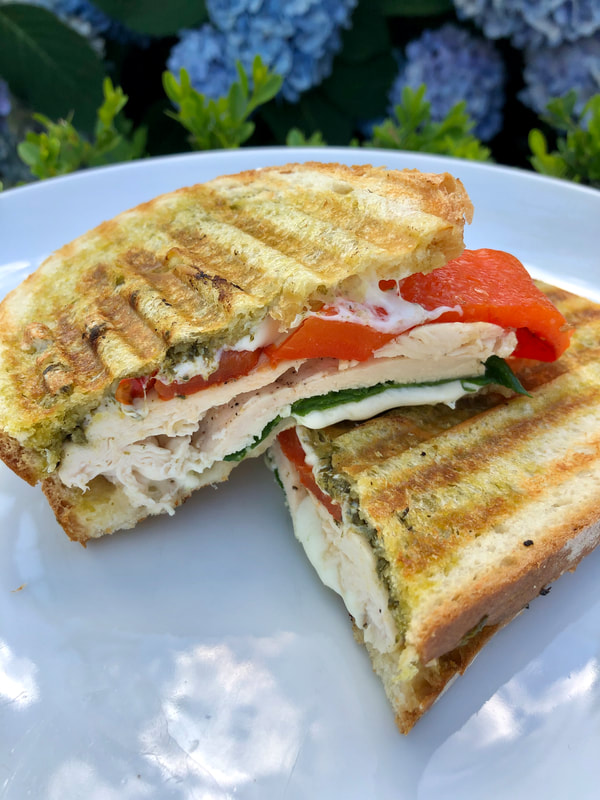
When the heat wave started last week, my husband suggested chicken paninis. I thought this was a good idea and I found a delightfully easy recipe on the Williams-Sonoma website for Chicken Panini with Pesto and Mozzarella.
A quick trip to the food store was needed to procure boneless chicken breasts, sliced Italian bread, a red pepper for making homemade roasted peppers, arugula and a small ball of fresh mozzarella cheese. I already had pesto in the refrigerator.
If you don’t own a panini press, you can still forge ahead and make these sandwiches. You’ll need two pans. A grill or fry pan and, preferable, one a cast iron. To help compress the sandwiches, one 28-ounce can of tomatoes or two smaller size cans will do. The sandwiches will go in one pan, while the cast iron is placed on top with the cans in the fry pan. The weight of the cast iron and cans will compress the sandwiches similar to the panini press.
The recipe calls for buttering the bread, however, I drizzled some olive oil on the outer sides of both slices before making the sandwich. Pesto is spread on one side of the bread slices. Next, two slices of mozzarella, some roasted pepper, grilled chicken, a bit of arugula and lastly, two additional slices of mozzarella.
Once done, it was into the panini press. A little patience, a quick peek and the sandwiches had a crispy, golden exterior. The sandwich was perfect for a light summertime meal.
Roasted Peppers
Roasted peppers are quick and easy to make at home. I cut my peppers in half and remove the white ribs and seeds. Place the halves rounded side down on a preheated, hot gas grill. I leave them on anywhere from 5 to 10 minutes or until the pepper’s exterior is blackened. Remove from the grill and place them in either a paper bag or bowl covered with plastic wrap. Either method you select will cause steam to build up which will help you to easily peel off the skin. Give the peppers approximately five minutes to steam before removing the skin; the peppers will be hot, so be careful. After the peppers have been peeled, I slice them into ¼” strips, drizzle with olive oil, salt, pepper and finely minced garlic.
Two other options for roasting peppers are to place them under the broiler or, as my late aunt would do, put them on a long two prong fork and roast them over a gas burner on the stovetop. One of her favorite things to eat was a roasted pepper sandwich on Italian bread…yum!
Easy Pickles
As with any sandwich, sometimes you like a pickle with it. Last summer my daughter got some Kirby cucumbers and pickling spices in her CSA (Community Supported Agriculture) box from Dreyers Farms of Cranford. She made a batch of pickles using a recipe the Easiest Fridge Dill Pickles from the website www.smittenkitchen.com. My husband loved them. This year he planted some dill and requested I make a batch. The recipe is very easy. You’ll mason jars, Kirby or small cucumbers, salt, white vinegar, dill seed or fresh dill, white onion, a bay leaf and garlic. Did I mention that you can start eating them as soon as an hour or two after making them? The pickles get better with age, after to 6 to 8 hours they’re perfect.
For my first time, I made one jar with fresh dill, the second jar had fresh dill and a few fresh bay leaves and the third jar had fresh dill, bay leaves and a large clove a garlic. The last jar was the first one we tried. When you open the jar, it reminds you of the pickle barrel that used to be in front of deli counters in the food stores. The pickles were crispy, briny, a hint of garlic and wonderfully tasty!
Peach Season
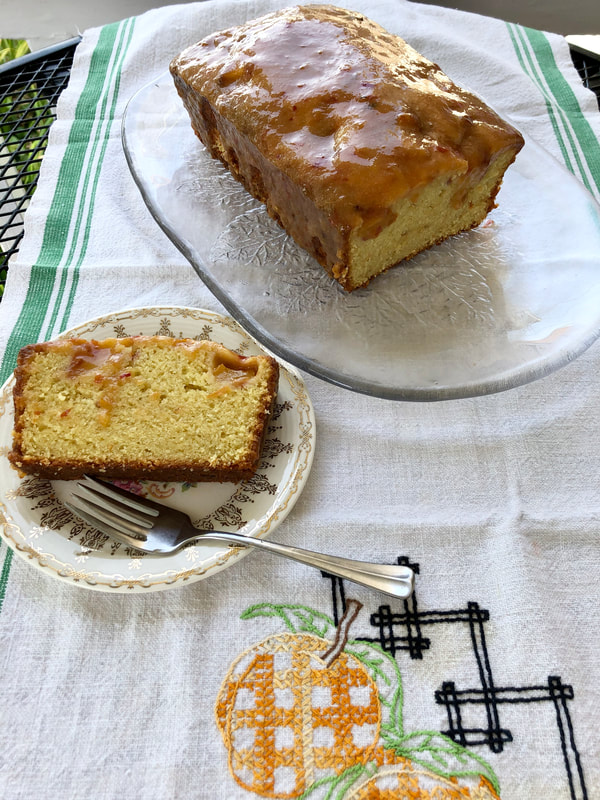
While scrolling through the NYT Cooking app, I came across a deliciously looking Peach Poundcake by Jerrelle Guy. In the image, you could see peach chunks suspended in the cake and then a semi-sheer glaze poured over the cake; it looked divine! As I my son and daughter-in-law were coming for dinner over the weekend, I had my husband pick up some New Jersey peaches at Delicious Orchards, Colts Neck, NJ.
For the recipe you’ll also need, unsalted butter, flour, fresh lemon juice, vanilla, confectioners’ sugar, granulated sugar, baking powder and kosher salt. The recipe calls for 3 peaches. One of the three is diced into 1/3” pieces while the other two are pureed. Part of the puree goes into the cake batter, while the rest is mixed with the confectioners’ sugar for the glaze.
The cake came together quite easily. I did, however, forget to add the peach chunks in the batter. When I realized my error, I could only put them on the top of the cake. In the end it didn’t matter. The cake was full of peach flavor (good peaches to begin with). The peach pieces gave it a bit of texture and the peach glaze merely reinforced the flavor; it was heavenly!
Once done, it was into the panini press. A little patience, a quick peek and the sandwiches had a crispy, golden exterior. The sandwich was perfect for a light summertime meal.
Roasted Peppers
Roasted peppers are quick and easy to make at home. I cut my peppers in half and remove the white ribs and seeds. Place the halves rounded side down on a preheated, hot gas grill. I leave them on anywhere from 5 to 10 minutes or until the pepper’s exterior is blackened. Remove from the grill and place them in either a paper bag or bowl covered with plastic wrap. Either method you select will cause steam to build up which will help you to easily peel off the skin. Give the peppers approximately five minutes to steam before removing the skin; the peppers will be hot, so be careful. After the peppers have been peeled, I slice them into ¼” strips, drizzle with olive oil, salt, pepper and finely minced garlic.
Two other options for roasting peppers are to place them under the broiler or, as my late aunt would do, put them on a long two prong fork and roast them over a gas burner on the stovetop. One of her favorite things to eat was a roasted pepper sandwich on Italian bread…yum!
Easy Pickles
As with any sandwich, sometimes you like a pickle with it. Last summer my daughter got some Kirby cucumbers and pickling spices in her CSA (Community Supported Agriculture) box from Dreyers Farms of Cranford. She made a batch of pickles using a recipe the Easiest Fridge Dill Pickles from the website www.smittenkitchen.com. My husband loved them. This year he planted some dill and requested I make a batch. The recipe is very easy. You’ll mason jars, Kirby or small cucumbers, salt, white vinegar, dill seed or fresh dill, white onion, a bay leaf and garlic. Did I mention that you can start eating them as soon as an hour or two after making them? The pickles get better with age, after to 6 to 8 hours they’re perfect.
For my first time, I made one jar with fresh dill, the second jar had fresh dill and a few fresh bay leaves and the third jar had fresh dill, bay leaves and a large clove a garlic. The last jar was the first one we tried. When you open the jar, it reminds you of the pickle barrel that used to be in front of deli counters in the food stores. The pickles were crispy, briny, a hint of garlic and wonderfully tasty!
Peach Season
While scrolling through the NYT Cooking app, I came across a deliciously looking Peach Poundcake by Jerrelle Guy. In the image, you could see peach chunks suspended in the cake and then a semi-sheer glaze poured over the cake; it looked divine! As I my son and daughter-in-law were coming for dinner over the weekend, I had my husband pick up some New Jersey peaches at Delicious Orchards, Colts Neck, NJ.
For the recipe you’ll also need, unsalted butter, flour, fresh lemon juice, vanilla, confectioners’ sugar, granulated sugar, baking powder and kosher salt. The recipe calls for 3 peaches. One of the three is diced into 1/3” pieces while the other two are pureed. Part of the puree goes into the cake batter, while the rest is mixed with the confectioners’ sugar for the glaze.
The cake came together quite easily. I did, however, forget to add the peach chunks in the batter. When I realized my error, I could only put them on the top of the cake. In the end it didn’t matter. The cake was full of peach flavor (good peaches to begin with). The peach pieces gave it a bit of texture and the peach glaze merely reinforced the flavor; it was heavenly!
Chicken Panini with Pesto and Mozzarella
Adapted from Williams-Sonoma Food Made Fast Series, Grilling, by Rick Rodgers (Oxmoor House, 2007)
Ingredients:
3 Tbs. pesto, purchased
4 slices crusty white sandwich bread
5 oz. fresh mozzarella cheese, cut into 8 thin slices
1 small roasted red pepper in vinegar, halved
Breast meat of classic grilled chicken, cut into 6 slices (about 5 oz. total)
6 oz. arugula, stems removed
3 Tbs. unsalted butter, at room temperature
Directions:
Prepare the sandwiches
Spread the pesto on one side of the bread slices. For each sandwich, layer 2 mozzarella slices; half each of the roasted red pepper, chicken and arugula; and 2 more mozzarella slices.
Refrigerate the sandwiches
Spread the outside of the sandwiches with the butter. Put the sandwiches on a sheet of waxed paper and refrigerate until the butter is firm, about 20 minutes.
Cook the sandwiches
Preheat a ridged fry pan or grill pan over medium heat until hot. Place the sandwiches in the pan and weight down with a second fry pan. Cook until the undersides are golden, about 2 1/2 minutes. Turn the sandwiches over, weight them down again and cook until golden on the other side, about 2 1/2 minutes more. Alternatively, cook the sandwiches using an electric panini press according to the manufacturer’s instructions.
Transfer the sandwiches to a cutting board, cut in half and serve immediately. Serves 2.
Easiest Fridge Dill Pickles
From www.smittenkitchen.com
Deb Perlman, food blogger
You can tweak these in any number of ways. You can add a couple cloves of garlic, lightly crushed but still inside their skin. You can use 1/2 to 1 teaspoon dill seeds instead of the fresh dill or 1 tablespoon of pickling spice, if you prefer that flavor. You could add all or a part of one white onion, sliced paper thin (use one less Kirby to compensate for volume). You can add a bay leaf or two. But, for us at least, the treat is how you can skip all of the above and still make a perfect pickle snack. With four ingredients, you’ve got no excuse not to always have them on hand.
If you can’t find Kirby’s, seedless cucumbers (those long ones usually in plastic) also work here, although they’ll be less crunchy.
[Updated: A few people commented that they found these too salty. I’m so sorry. I’m now recommending a modified amount, to be safe. You can bump up the salt as high as 5 teaspoons if you find you’d like more.]
8 larger or to 10 smaller firm, fresh Kirby (pickling) cucumbers
3 teaspoons kosher, coarse or pickling salt (if using a featherweight brand such as Diamond, use a little more)
1 to 2 tablespoons chopped fresh dill
1/2 cup white vinegar
Slice your cucumbers very thin — I used 1/8-inch slices here but usually go even thinner on a mandoline. Place them in a 1-liter or equivalent lidded jar. Add 3 teaspoons salt and dill, then pour in white vinegar. Close the jar and give it a few shakes to begin distributing the ingredients.
You’re going to find the liquid level in the jar worrisomely low as it is well below the pickle pile line, but don’t fret. Within an hour or two, the salt will draw the moisture from the cucumbers and wilt them, while the liquid becomes a perfectly balanced pickle brine.
Place jar in the refrigerator near the front, which should remind you to shake it once or twice more over the new few hours. (Or whenever you’re back at the fridge.) You can eat them as little as 1 to 2 hours later, but they become ideal at 6 to 8 hours. They’ll keep in the fridge, submerged in their brine, for 3 weeks, though never around here.
Peach Poundcake
From NYT Cooking
JERRELLE GUY
INGREDIENTS
1 cup/230 grams unsalted butter (2 sticks), melted and cooled to room temperature, plus more for greasing the pan
2 ½ cups/320 grams all-purpose flour, plus more for dusting the pan
3 medium, ripe, red-hued peaches (about 1 pound), pitted (see Note)
1 tablespoon fresh lemon juice
3 large eggs plus 1 large egg yolk, beaten
1 ½ teaspoons vanilla extract
1 cup/125 grams unsifted confectioners’ sugar, plus more as needed
1 ½ cups/300 grams granulated sugar
2 ½ teaspoons baking powder
¾ teaspoon kosher salt
PREPARATION
- Heat oven to 325 degrees. Lightly butter and flour a 9-by-5-inch loaf pan, and set aside.
- Dice 1 peach into 1/3-inch pieces. Pat the pieces dry with a paper towel and set aside.
- Add the remaining 2 peaches and the lemon juice to a food processor or blender, and blend on high until completely puréed. Measure out 1 leveled cup of the purée and transfer it to a mixing bowl along with the melted butter, eggs, egg yolk and vanilla. Whisk to combine and set aside.
- Completely scrape down the sides of the food processor, and make the icing using the small amount of puréed peaches still remaining: Add 1 cup of the confectioners’ sugar to the remaining peach purée in the food processor and blend on high until combined. The icing should be thick but thin enough to drizzle. Add more confectioners’ sugar to thicken or a splash of water to thin, as needed. Cover and set aside until it’s time to ice the cake.
- In a large mixing bowl, add the flour, granulated sugar, baking powder and salt, and whisk to combine. Pour the peach mixture into the flour mixture, and whisk well until the batter is thoroughly combined, then fold in the diced peaches. Transfer the batter to the loaf pan, spread evenly to the edges, and bake until crusty and golden brown on the top and a toothpick inserted into the center comes out clean, 75 to 80 minutes. Remove from the oven and allow to cool for 10 minutes before transferring to a wire rack.
- Stir the icing a final time and spread it on top of the warm cake, allowing the extra icing to drip down the sides. Cool the cake to room temperature. Slice and serve, or wrap tightly with plastic wrap and store on the counter for up to 3 days.
- Use the boldest-colored peaches you can find, as their skins will lend blush to the glaze. However, you can also peel the peaches, if you mind the specks of skin.