 Donna Walsifer
cooking for two
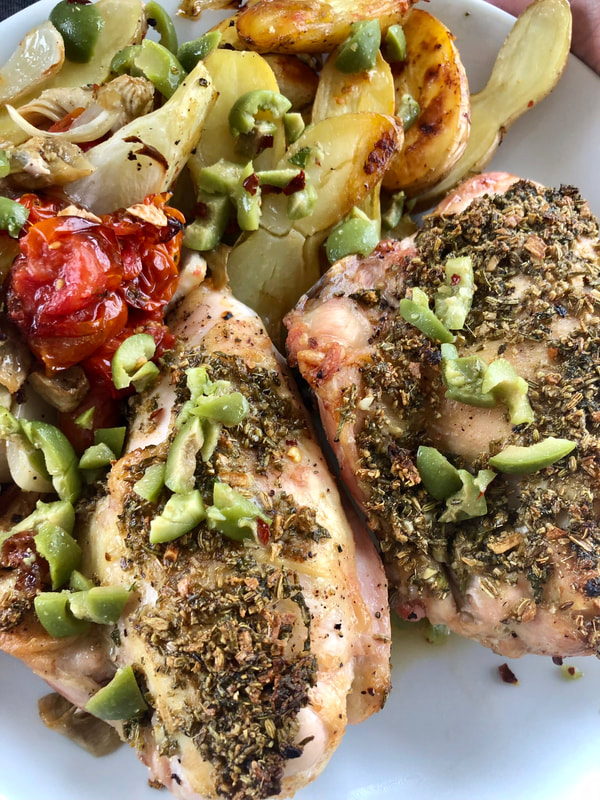
Some recipes are easier than others when scaling down for two people. Other times, I’m asking Siri for conversions or using my calculator to get the measurements just right. A sheet pan recipe by Ali Slagle of The New York Times made it easy for me with her recipe for Sheet-Pan Chicken with Artichokes and Herbs.
For this recipe you’ll need fennel bulbs, a can of artichoke hearts, cherry tomatoes, extra-virgin olive oil, kosher salt, freshly ground black pepper, minced garlic, ground fennel, fresh rosemary, fresh sage, chicken thighs (bone-in, skin-on), pitted green olives, fresh lemon juice and red pepper flakes.
The fennel is cut into wedges and placed on a rimmed baking sheet along with the artichokes, tomatoes and dressed with olive oil, salt and pepper. In a small bowl garlic, ground fennel, rosemary, salt and olive oil are whisked together. The chicken is seasoned with salt and pepper and rubbed with the spice mixture. The chicken goes on top of the vegetables skin-side up.
It’s roasted in a 425° oven for 35 to 40 minutes. The chicken and vegetables are plated and the pan juices are poured into a fat skimmer or bowl to rest. The fat is skimmed off and the olives, lemon juice and red pepper flakes are added and drizzled over the chicken and vegetables.
My husband and I really enjoyed this preparation. I used bone-in, skin-on chicken and cooked it longer. The flavors melded lovely together with the red pepper flakes adding a subtle touch of heat, which you can omit. The fennel, artichokes and tomatoes gave the dish a flavorsome taste and complexity. It was a delicious weeknight sheet pan meal.
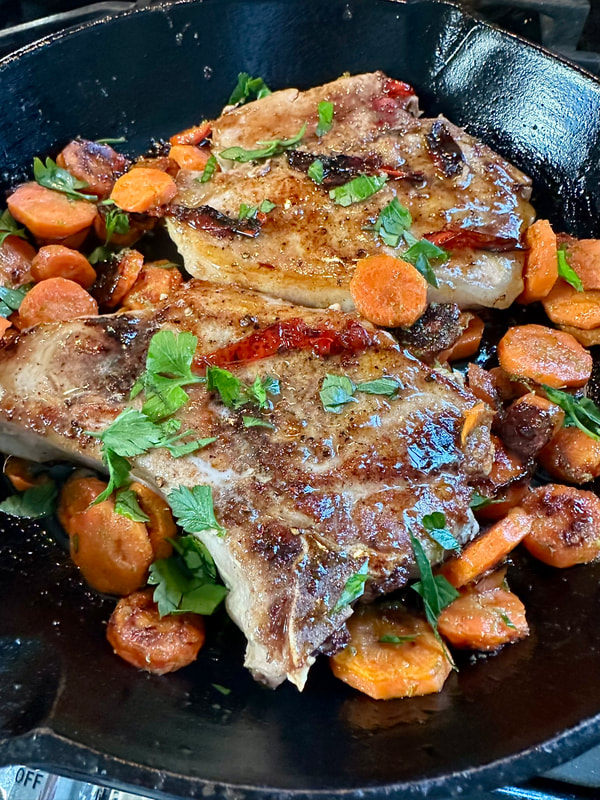
Another Ali Slagle recipe I tried was Honey-Habanero Pork Chops with Carrots. For the recipe you’ll need, 1/2-inch-thick pork chops, paprika, salt, neutral oil, carrots, a lime, habanero chiles (halved and seeded), honey and chopped cilantro for garnish.
This is a quick cooking recipe, hence the thinness of the pork chops. The pork is seasoned with paprika and salt. In a cast iron skillet over medium-high heat, oil is added and sliced carrots are seasoned with salt and pepper, cooked and charred for 3 to 5 minutes. The carrots are removed to a dish and lime zest covers the carrots.
With additional oil, the pork chops and chiles cook. Press down on the meat with your tongs to prevent curling. I used a grill press that I purchased at a local restaurant supply store to keep the chops flat. The meat cooks about 3 minutes per side. When done, they’re removed and the heat reduced. The honey and lime juice are added and cooked until thickened. Off heat the pork, carrots and resting juices are added to the pan and coated on all sides with the sauce.
This was a delicious meal, though a bit spicy. I did remove the pepper ribs to reduce some of the heat, but I probably could have used just have a habanero for flavor and heat. The charred chilis provided some smokiness and the sweet and hot combination of flavors was tasty. Overall, something different with pork.
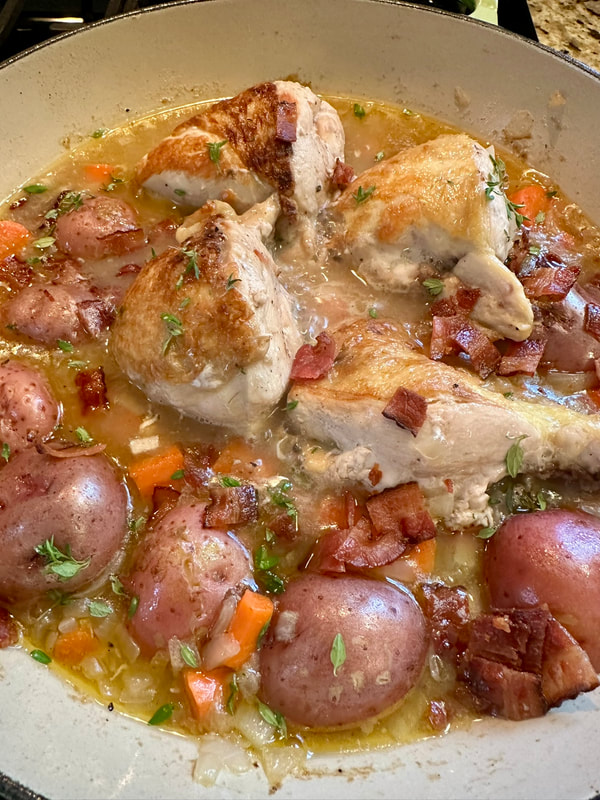
Sometimes, you can get lucky and a publication such as “Southern Living Magazine” publishes a group of two serving entrees. In the January/February 2025 issue, I found Wine-Braised Chicken and Vegetables. Not only did this recipe include white wine, but also deglazed the pan with a bit of bourbon…yum! For the recipe you’ll need thick cut bacon, chicken thighs, kosher salt, black pepper, bourbon, unsalted butter, sweet onion, baby red potatoes, flour, dry white wine, fresh thyme sprigs and chicken stock.
The recipe begins by cooking the bacon in a enameled-cast iron skillet until crispy. Remove the bacon when done, discard any drippings. Pat chicken dry and season with salt and pepper. Placing the chicken skin side down in the pan, cook until the skin is crispy and can be easily lifted from pan; remove and set aside. For the next step, remove pan from heat and add bourbon; scrape any brown bits from the pan. When the bourbon is evaporated, add butter, carrots, onions, potatoes and flour. Stir until the flour coats the vegetables and the raw flavor is cooked out. Add the wine, thyme sprigs and bring to boil. Place the chicken amongst the vegetables and cook uncovered until the chicken is cook through. You want and internal temperature of 170° on the thighs.
Remove chicken from pan and increase heat to cook the vegetables until tender. You can add butter to make the sauce glossy, but I left that step out. Make sure to remove the thyme sprigs, adjust salt then add chicken to pan to absorb flavors. To serve, garnish with thyme leaves and bacon bits.
This was a scrumptious one pot meal. We really loved the flavors incorporated into the dish. The thyme was a wonderful accent flavor as well as the acidity from the wine that brightened the dish and the bourbon added a richness to the sauce. This was a great meal for a family weeknight. As far as the alcohol, it evaporates during cooking.
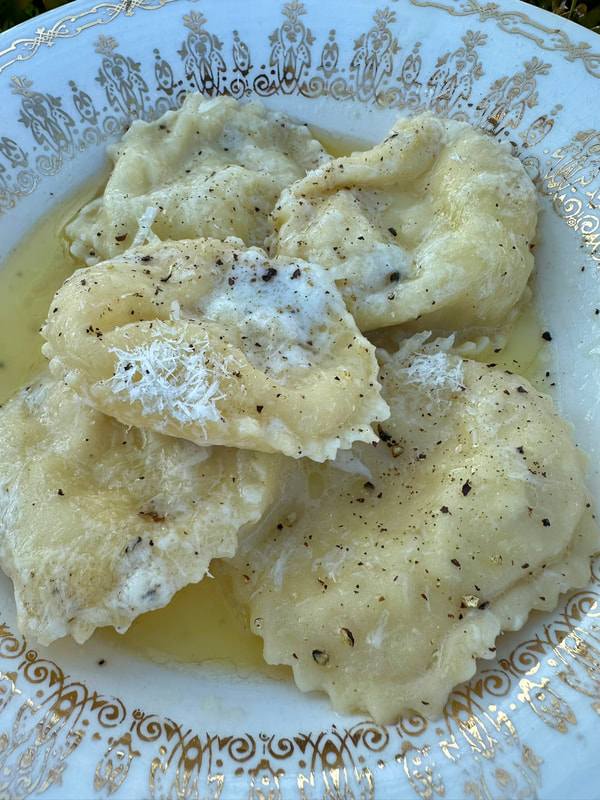
In a recent episode of Lidia Bastianich’s cooking show, she demonstrated Fresh Pear and Pecorino Ravioli with Cacio e Pepe Sauce. This recipe is for those cooks who feel comfortable making homemade pasta dough with a machine or rolled out by hand. Can you use premade fresh pasta sheets? I don’t see why not, it’s worth a try don’t you think?
If you feel ambitious, Light Egg Pasta Dough by Lidia Bastianich is very easy to make and work with; I’ve made it before. For the dough you’ll need all-purpose flour, eggs, extra-virgin olive oil and water. You can make this dough by hand or in a food processor, the processor is the way to go. Once you have the dough made it needs to rest for 1/2 hour to relax the gluten and hydrate. If rolling by hand you’ll want to use a long dowel rolling pin to get the dough paper thin. If you using a pasta machine, you’ll start rolling on the thickest setting and then reduce down. I found that if you didn’t go to the final thin setting, the pasta was easier to work with for ravioli.
I didn’t realize that there were two similar recipes for the filling on Lidia’s website. One is Fresh Pear and Pecorino Ravioli with Cacio é Pepe Sauce with a filling using a Bartlett pear, 1-1/2 cups grated Grana Padano and mascarpone cheeses. The one I followed, Fresh Pear and Pecorino Ravioli, has a cheese filling using a younger pecorino Romano cheese (3 to 6 months) that’s softer and a 12 month aged pecorino for the sauce. My local food store only carried cheese that was aged for 9 to 12 months. As I couldn’t locate a younger cheese, I used the aged variety for the filling and sauce. The sauce is made with butter, Pecorino Romano cheese and coarsely ground black pepper.
To make the ravioli, roll the dough for strips for filling. If you’re using a ravioli cutter, take into consideration the diameter of the ravioli in relation to the width of your strips. For my ravioli cutter, I used about 1-1/2 teaspoons for my filling. When done, place the ravioli on a lightly floured towel-lined or parchment-lined tray. Make sure the edges of the pasta are well sealed. Cover the pasta with a towel and continue making ravioli.
Cook the ravioli as you would regular pasta, salted water, until ravioli float to the top. While the pasta cooks, heat the butter in a wide skillet, add a cup of the boiling pasta water. As the pasta finishes, use a spider to gently place the ravioli into the butter mixture; coat. Add the cheese and gently stir to melt the cheese; coarsely grate the black pepper on top.
This was a fabulous dish. Fresh pasta dough makes for light tasting pasta, with the cheese imparting a sharp, lightly salty flavor with a hint of sweetness from the pear. The filling was a nice contrast to the cheese sauce. The mascarpone, a mild and creamy cheese, held the filling together and lent to the melting of the cheese. Overall, worth the work for this delicious pasta dish.
My husband and I really enjoyed this preparation. I used bone-in, skin-on chicken and cooked it longer. The flavors melded lovely together with the red pepper flakes adding a subtle touch of heat, which you can omit. The fennel, artichokes and tomatoes gave the dish a flavorsome taste and complexity. It was a delicious weeknight sheet pan meal.
Another Ali Slagle recipe I tried was Honey-Habanero Pork Chops with Carrots. For the recipe you’ll need, 1/2-inch-thick pork chops, paprika, salt, neutral oil, carrots, a lime, habanero chiles (halved and seeded), honey and chopped cilantro for garnish.
This is a quick cooking recipe, hence the thinness of the pork chops. The pork is seasoned with paprika and salt. In a cast iron skillet over medium-high heat, oil is added and sliced carrots are seasoned with salt and pepper, cooked and charred for 3 to 5 minutes. The carrots are removed to a dish and lime zest covers the carrots.
With additional oil, the pork chops and chiles cook. Press down on the meat with your tongs to prevent curling. I used a grill press that I purchased at a local restaurant supply store to keep the chops flat. The meat cooks about 3 minutes per side. When done, they’re removed and the heat reduced. The honey and lime juice are added and cooked until thickened. Off heat the pork, carrots and resting juices are added to the pan and coated on all sides with the sauce.
This was a delicious meal, though a bit spicy. I did remove the pepper ribs to reduce some of the heat, but I probably could have used just have a habanero for flavor and heat. The charred chilis provided some smokiness and the sweet and hot combination of flavors was tasty. Overall, something different with pork.
Sometimes, you can get lucky and a publication such as “Southern Living Magazine” publishes a group of two serving entrees. In the January/February 2025 issue, I found Wine-Braised Chicken and Vegetables. Not only did this recipe include white wine, but also deglazed the pan with a bit of bourbon…yum! For the recipe you’ll need thick cut bacon, chicken thighs, kosher salt, black pepper, bourbon, unsalted butter, sweet onion, baby red potatoes, flour, dry white wine, fresh thyme sprigs and chicken stock.
The recipe begins by cooking the bacon in a enameled-cast iron skillet until crispy. Remove the bacon when done, discard any drippings. Pat chicken dry and season with salt and pepper. Placing the chicken skin side down in the pan, cook until the skin is crispy and can be easily lifted from pan; remove and set aside. For the next step, remove pan from heat and add bourbon; scrape any brown bits from the pan. When the bourbon is evaporated, add butter, carrots, onions, potatoes and flour. Stir until the flour coats the vegetables and the raw flavor is cooked out. Add the wine, thyme sprigs and bring to boil. Place the chicken amongst the vegetables and cook uncovered until the chicken is cook through. You want and internal temperature of 170° on the thighs.
Remove chicken from pan and increase heat to cook the vegetables until tender. You can add butter to make the sauce glossy, but I left that step out. Make sure to remove the thyme sprigs, adjust salt then add chicken to pan to absorb flavors. To serve, garnish with thyme leaves and bacon bits.
This was a scrumptious one pot meal. We really loved the flavors incorporated into the dish. The thyme was a wonderful accent flavor as well as the acidity from the wine that brightened the dish and the bourbon added a richness to the sauce. This was a great meal for a family weeknight. As far as the alcohol, it evaporates during cooking.
In a recent episode of Lidia Bastianich’s cooking show, she demonstrated Fresh Pear and Pecorino Ravioli with Cacio e Pepe Sauce. This recipe is for those cooks who feel comfortable making homemade pasta dough with a machine or rolled out by hand. Can you use premade fresh pasta sheets? I don’t see why not, it’s worth a try don’t you think?
If you feel ambitious, Light Egg Pasta Dough by Lidia Bastianich is very easy to make and work with; I’ve made it before. For the dough you’ll need all-purpose flour, eggs, extra-virgin olive oil and water. You can make this dough by hand or in a food processor, the processor is the way to go. Once you have the dough made it needs to rest for 1/2 hour to relax the gluten and hydrate. If rolling by hand you’ll want to use a long dowel rolling pin to get the dough paper thin. If you using a pasta machine, you’ll start rolling on the thickest setting and then reduce down. I found that if you didn’t go to the final thin setting, the pasta was easier to work with for ravioli.
I didn’t realize that there were two similar recipes for the filling on Lidia’s website. One is Fresh Pear and Pecorino Ravioli with Cacio é Pepe Sauce with a filling using a Bartlett pear, 1-1/2 cups grated Grana Padano and mascarpone cheeses. The one I followed, Fresh Pear and Pecorino Ravioli, has a cheese filling using a younger pecorino Romano cheese (3 to 6 months) that’s softer and a 12 month aged pecorino for the sauce. My local food store only carried cheese that was aged for 9 to 12 months. As I couldn’t locate a younger cheese, I used the aged variety for the filling and sauce. The sauce is made with butter, Pecorino Romano cheese and coarsely ground black pepper.
To make the ravioli, roll the dough for strips for filling. If you’re using a ravioli cutter, take into consideration the diameter of the ravioli in relation to the width of your strips. For my ravioli cutter, I used about 1-1/2 teaspoons for my filling. When done, place the ravioli on a lightly floured towel-lined or parchment-lined tray. Make sure the edges of the pasta are well sealed. Cover the pasta with a towel and continue making ravioli.
Cook the ravioli as you would regular pasta, salted water, until ravioli float to the top. While the pasta cooks, heat the butter in a wide skillet, add a cup of the boiling pasta water. As the pasta finishes, use a spider to gently place the ravioli into the butter mixture; coat. Add the cheese and gently stir to melt the cheese; coarsely grate the black pepper on top.
This was a fabulous dish. Fresh pasta dough makes for light tasting pasta, with the cheese imparting a sharp, lightly salty flavor with a hint of sweetness from the pear. The filling was a nice contrast to the cheese sauce. The mascarpone, a mild and creamy cheese, held the filling together and lent to the melting of the cheese. Overall, worth the work for this delicious pasta dish.
Sheet-Pan Chicken with Artichokes and Herbs
By Kay Chun
The New York Times/NYT Cooking, April 30, 2021
Total time: 50 minutes
Yield: 4 servings
Ingredients
3 large fennel bulbs (about 3 pounds), trimmed, halved lengthwise and cut into ½-inch-thick wedges
2 (14-ounce) cans whole artichoke hearts in water, drained and halved lengthwise
8 ounces cherry tomatoes
6 tablespoons extra-virgin olive oil
Kosher salt and pepper
2 tablespoons minced garlic
2 tablespoons ground fennel
1 tablespoon finely chopped fresh rosemary
1 tablespoon finely chopped fresh sage
8 bone-in, skin-on chicken thighs (about 3 pounds)
½ cup pitted green olives, chopped
2 tablespoons fresh lemon juice
1 teaspoon red-pepper flakes (optional)
Preparation
- Heat oven to 425 degrees. On a rimmed baking sheet, combine fennel wedges, artichokes, tomatoes and 3 tablespoons oil. Season with salt and pepper and toss to evenly coat. Spread in an even layer.
- In a small bowl, combine garlic, ground fennel, rosemary, sage and the remaining 3 tablespoons oil. Season chicken all over with salt and pepper, then rub with spice mixture. Arrange the chicken on top of the vegetables skin-side up.
- Roast until vegetables are tender and chicken is golden and crisp and cooked through, 35 to 40 minutes.
- Divide chicken and vegetables among plates. Pour pan juices into a small bowl, let settle and then skim off the fat with a spoon. Stir in olives, lemon juice and red-pepper flakes (if using). Spoon sauce over chicken and vegetables. Serve warm.
Honey-Habanero Pork Chops with Carrots
By Ali Slagle
The New York Times/NYT Cooking, September 24, 2024
Total time: 25 minutes
Prep time: 5 minutes
Cook time: 20 minutes
Yield: 4 servings
Ingredients
4 thin (½-inch) boneless pork chops (about 1½ pounds total)
1½ teaspoons paprika
Salt
¼ cup neutral oil, such as grapeseed
4 medium carrots, thinly sliced
1 lime
2 habanero chiles, halved and seeded
¼ cup honey
Chopped cilantro, for serving
Preparation
- Pat the pork dry and season all over with the paprika and a big pinch of salt. Set aside.
- Heat 2 tablespoons oil in a large cast-iron skillet over medium-high. Add the carrots, season with salt and stir occasionally until crisp-tender and charred in spots, 3 to 5 minutes. Turn off the heat. Scrape the carrots onto a plate and zest the lime over the top. Cut the lime in half.
- Heat the remaining 2 tablespoons oil in the skillet over medium-high. Add the pork and the chiles. Cook, pressing the meat with tongs to prevent buckling, until browned, 3 to 4 minutes. Flip and cook until firm to the touch, 1 to 3 minutes. Transfer the pork to the plate (leave the chiles in the skillet).
- Reduce the heat to medium-low and add the honey and juice from half the lime. Stir constantly until thickened and dark like maple syrup, 1 to 3 minutes. Turn off the heat, add the pork, carrots and any resting juices back to the skillet. Turn to coat in the glaze. Serve sprinkled with the cilantro.
Wine-Braised Chicken and Vegetables
“Southern Living Magazine, January/February 2025
Active time: 45 minutes
Total time: 1 hour 40 minutes
Servings: 2
Ingredients:
3 thick-cut bacon slices, cut into 1-inch pieces
4 (8 oz.) bone-in, skin-on chicken thigh
1-1/2 tea. Kosher salt, divided (1 teaspoon and ½ teaspoon)
½ tea. black pepper
1/4 c. bourbon
6 tbsp. unsalted butter, divided (3 tablespoons and 3 tablespoons)
2 carrots, peeled and chopped (about 1 cup)
1 sweet onion, chopped (about 1-2/3 cups)
½ lb. baby red potatoes, halved (about 1-1/4 cups)
2 tbsp. all-purpose flour
2 cups dry white wine (such as Sauvignon Blanc or Pinot Grigio)
5 thyme sprigs, plus fresh thyme leaves for garnish
1-1/2 cups chicken stock
- Heat bacon in a large, deep, enamel-coated cast-iron skillet over medium. Cook stirring occasionally, until crispy, about 8 minutes. Transfer bacon to a paper-towel lined plate. Discard drippings, or save for another use. Do not wipe skillet clean.
- Reduce heat to medium-low. Pat chicken dry, and sprinkle with 1 teaspoon of the salt and pepper. Place chicken in skillet, skin side down. Cook, undisturbed, until skin is crispy and easily releases from pan, about 18 minutes, increasing heat to medium-high after first 10 minutes of cooking. Transfer to a plate.
- Remove skillet from heat.. add bourbon, return to heat over medium. Cook, stirring to scrape up browned bits from bottom of pan, until bourbon is evaporated, about 1 minute. Add 3 tablespoons butter, carrots, onion, potatoes and flour; cook, stirring constantly, 2 minutes. Add wine, thyme sprigs and stock; bring to boil over high. Nestle chicken into sauce, skin side up, reduce heat to medium-low. Simmer uncovered, stirring occasionally until chicken is cooked through and a thermometer inserted into thickest portion of chicken registers 170°F, about 30 minutes.
- Transfer chicken to a clean plate. Increase heat to medium-high; cook, stirring often, until vegetables are tender and sauce has thickened slightly or is desired consistency, 5 to 10 minutes. Remove from heat; stir in remaining 3 tablespoons butter and ½ teaspoon salt. Remove thyme sprigs. Return chicken to pan; let stand 10 minutes. Garnish with thyme leaves and crumbled bacon.
Fresh Pear and Pecorino Ravioli
“Lidia’s Family Table,”
Lidia Matticchio Bastianich
With David Nussbaum
A Borzoi book published by Alfred A. Knopf ©2004 Tutti a Tavola
“This delicate and quite simple ravioli is a lovely way to enjoy the affinity of pear and cheese. The filling is a lively blend of shredded ripe pear, shredded 3 to 6 months aged Pecorino Romano (it should be semisoft) and mascarpone—just stirred together at the last moment.”
Ingredients
A large, 1/2-pound, firm ripe Bartlett pear (or 2 small pears), most pears will make a good filling as long as they are ripe but firm
8 ounces freshly shredded 3 to 6 months aged Pecorino Romano
1-1/2 tablespoons chilled mascarpone
For Cacio e Pepe Sauce
6 ounces butter
4 ounces mild 12 months Pecorino Romano, grated
Abundant coarsely ground black pepper, to taste
Directions
Peel and core the pear and shred it against the large holes of a box grater. Stir the shreds with the shredded cheese in a bowl and blend in the mascarpone.
Filling the Ravioli:
Following the master method, roll dough strips for filling. For each raviolo, scoop a scant tablespoon of filling, shape it round and drop in place. Cover and cut ravioli by master method.
Saucing in the Skillet and Finishing:
Cook the ravioli as usual. Meanwhile, heat the butter until simmering in the large skillet and thin it with a cup of the boiling pasta water. Lay the cooked ravioli in the skillet and coat with the hot butter. Remove the pan from the heat and sprinkle over the grated aged Pecorino, mixing gently so the cheese begins to melt into a sauce, then grind coarse black pepper all around.
Light Egg Pasta Dough
Pasta Fresca
“Lidia’s – Mastering the Art of Italian Cuisine,”
Lidia Matticchio Bastianich and
Tanya Bastianich Manuali
Alfred A. Knopf, New York ©2015
Ingredients
2 cups all-purpose flour, plus more for dusting
2 large eggs
¼ cup extra-virgin olive oil
3 tablespoons water
Directions
To make the dough in the food processor:
Pasta Fresca
“Lidia’s – Mastering the Art of Italian Cuisine,”
Lidia Matticchio Bastianich and
Tanya Bastianich Manuali
Alfred A. Knopf, New York ©2015
Ingredients
2 cups all-purpose flour, plus more for dusting
2 large eggs
¼ cup extra-virgin olive oil
3 tablespoons water
Directions
- To make the dough by hand: Measure the flour, and shake it through a sieve into a medium mixing bowl. Drop the eggs and/or egg yolks into a small bowl; beat briefly with a fork to break them up.
- Pour in the measured amounts of oil and water, and mix well with the eggs. Pour the wet ingredients into the flour. Toss and mix everything with a fork until all the flour is moistened and starts to clump together.
- Lightly flour your hands, then gather the clumps and begin kneading right in the bowl, folding the raggedy mass over, pushing and turning it, then folding again. When you’ve formed a cohesive clump of dough, turn it out onto a small work surface lightly dusted with ½ teaspoon flour, and continue kneading for 2 to 3 minutes, until the dough is smooth and shiny on the outside, soft throughout (no lumps), and stretchy. If your dough seems too sticky or hard after it has been kneaded for a minute or two, adjust the consistency with very small amounts of flour or water.
- Form the dough into a disk, wrap it tightly in plastic wrap, and let it rest at room temperature for ½ hour.
To make the dough in the food processor:
- Fit the regular steel dough blade in the bowl of the processor. Measure the flour into the bowl; process for a few seconds to blend and aerate.
- Drop the eggs and/or egg yolks into a small bowl; beat briefly with a fork to break them up. Mix in the measured amounts of oil and water. To minimize the change of overheating the dough, use eggs right from the refrigerator, and cold water. Start the machine running with the feed tube open. Pour the wet mixture into the bowl quickly; scrape all the eggs drippings out of the bowl into the processor, too. Let the machine run for about 30 seconds. A dough should form quickly; most of it should clump or ball up on the blade, where it will twist and knead; some may spread on the side of the bowl. Let the machine knead the dough for about 10 seconds (no more than 40 seconds total processing).
- Turn the dough out onto a very lightly floured surface, and knead by hand for another 30 seconds or so, until it’s smooth, soft and stretchy. Wrap and rest the dough, or store it as described for making the dough by hand. If you have a problem in the food processor – if there is no apparent clumping after 30 seconds, or the dough stiffens up very quickly – stop the machine and feel the dough. Adjust for stickiness or dryness by working in either flour or water in small amounts. You can continue to work the dough in the machine, but don’t process for more than a total of 40 seconds. Or you can turn the dough out to correct the consistency and finish kneading by hand.