 Donna Walsifer
remaining weeks of summer

Thank goodness this summer's heatwaves have been short lived, several days at most. Last week's weather was delightful as we were able to open the windows and enjoy the gentle summer breeze and cool nights.
Recently in our CSA box, we were given long hot peppers. I briefly worked in a butcher shop where they were stuffed with Italian sausage and garnished with shredded cheese. Expanding on this idea, I found a recipe for Stuffed Long Hots on a website called "Mangia with Michele." Her recipe calls for 8-10 long hot peppers (approximately 3/4 to 1 pound), Pecorino Romano cheese, plain breadcrumbs, chopped fresh parsley or basil, ground black pepper, Italian sausage (hot or sweet, your choice), shredded mozzarella, sun dried tomatoes (oil-packed), extra virgin olive oil and marinara or pesto sauce.
Recently in our CSA box, we were given long hot peppers. I briefly worked in a butcher shop where they were stuffed with Italian sausage and garnished with shredded cheese. Expanding on this idea, I found a recipe for Stuffed Long Hots on a website called "Mangia with Michele." Her recipe calls for 8-10 long hot peppers (approximately 3/4 to 1 pound), Pecorino Romano cheese, plain breadcrumbs, chopped fresh parsley or basil, ground black pepper, Italian sausage (hot or sweet, your choice), shredded mozzarella, sun dried tomatoes (oil-packed), extra virgin olive oil and marinara or pesto sauce.
With the hot peppers, I removed the seeds and ribs to reduce most of the heat. The cheese, bread crumbs, chopped parsley or basil and black pepper are mixed together and set aside. I misread this step and combined the mixture into the uncased sweet poultry sausage that I purchased. I also added the shredded mozzarella and used rehydrated sun-dried tomatoes as that’s what I had on hand. I placed the mixture into the peppers and drizzled with some olive oil. If you followed the recipe accordingly, the breadcrumb mixture would go on top of the peppers.
The peppers bake at 400° for 20 minutes or until an internal temperature of 165° is reached. You could also place the peppers under the broiler for 1 to 2 minutes for a little crunch.
Despite my error, these peppers turned out wonderfully. The breadcrumbs held the meat together and the rehydrated sun-dried tomatoes added another layer of flavor to the filling.
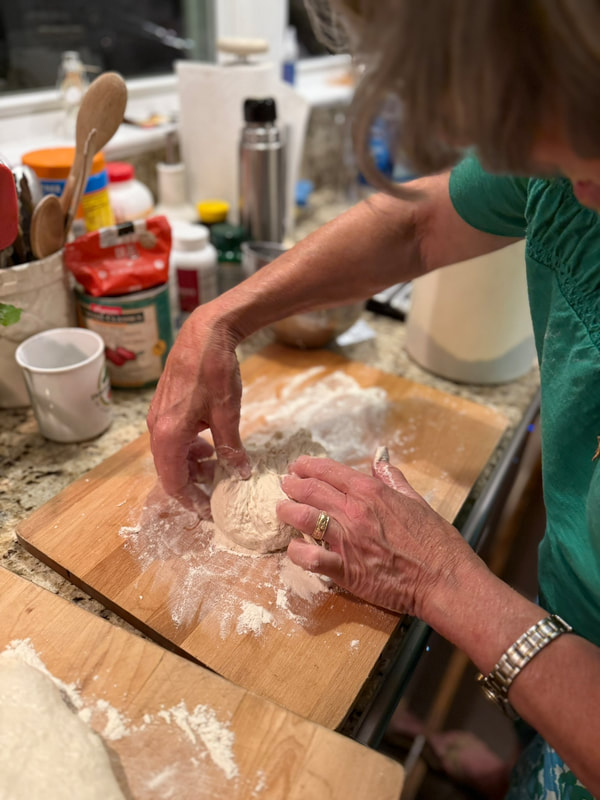
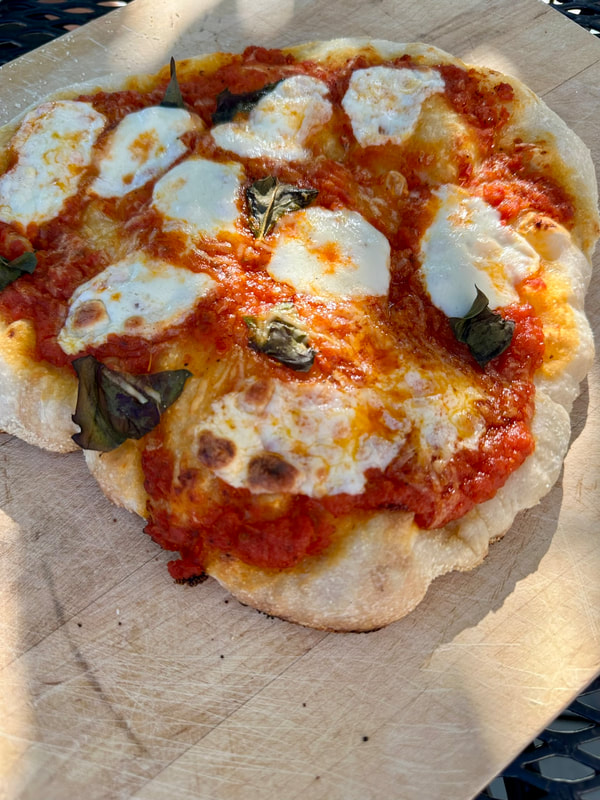
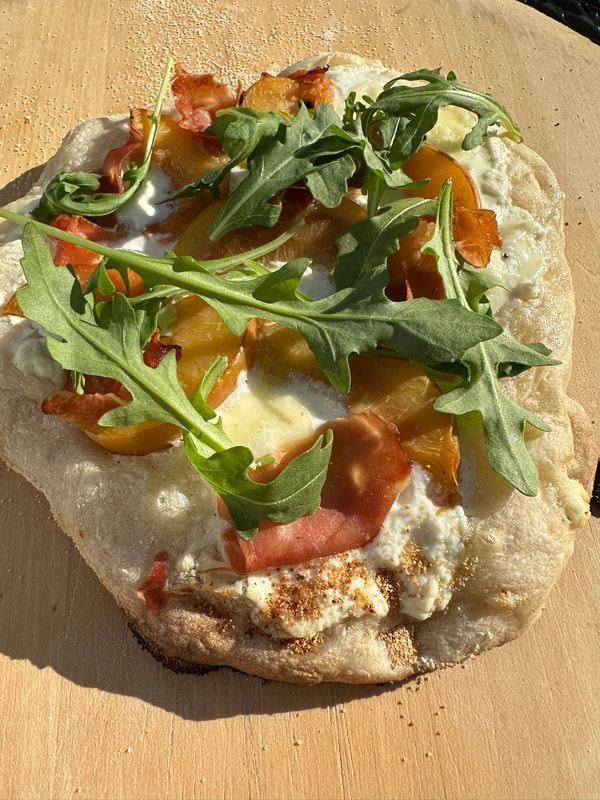
I’ve been making my own pizza dough for many years and have cooked it outside on my gas grill. The dough recipe is one I found in Arthur Schwartz's book “Naples at Table.” While easy to make, occasionally when the dough bakes, it puffs up significantly and is too bready. In the last few years several artisanal pizza places have opened in my area such as Catbird Asbury Park, with its wood fired pizza, and Pizzeria Lucci of Belmar. I also enjoy DelPonte's Coal Fired Pizza in Bradley Beach. What these three restaurants have in common is a light tasting pizza, bakes up with a crisp bottom and obtains a nice brown color and charring.
To step up my game, I found a recipe by Dan Richer, owner of Razza Pizza Artigianale in Jersey City, NJ, posted on the website for Onni Pizza Ovens. When I made this recipe, I had 8-250g pizza portions. This recipe takes three days to make which also includes proofing time. In order to better comprehend how to prepare the dough, I found a video by Jon Crane where he demonstrates Mr. Richer's pizza dough method.
Here are a few takeaways I got from Mr. Richer's recipe as compared to Mr. Crane’s prep:
While this recipe takes time and patience, I think I’ve found my new pizza dough recipe. Although very sticky, I was able to make the dough work for me. I was, however, unable to cook the pizza on the grill grates. I adapted my baking by placing two bricks on the grill grates and topping with the pizza stone. When the dough firmed up a bit, using my pizza peel, I transferred it to the grill rack to finish cooking. The high hydration dough was much lighter tasting than my previous recipe.
Why is this dough better? “00” flour is a finely milled grind that is traditionally used for Neapolitan pizza dough. When baked at high temperatures it makes for a crispy crust and moderate chewiness. Also, the “00” grind allows for longer dough fermentation and crispy crust. The ratio of water to flour makes for larger pockets of air producing a lighter crust. I also learned that high hydration dough needs less yeast as it will obtain its spring from the steam released by the dough when baking.
My husband and I thoroughly enjoyed the pizza with this dough, but he would prefer it be stretched a little thinner.
By the way, I took a ride to Samaha's Farm in Aberdeen, NJ today and picked up a case of plum tomatoes to begin making my fresh tomato sauce that lasts all winter long. I still have a few jars left from last year, but I only plan on cooking two cases of tomatoes this year. Here’s a video of how I make my sauce.
The peppers bake at 400° for 20 minutes or until an internal temperature of 165° is reached. You could also place the peppers under the broiler for 1 to 2 minutes for a little crunch.
Despite my error, these peppers turned out wonderfully. The breadcrumbs held the meat together and the rehydrated sun-dried tomatoes added another layer of flavor to the filling.
I’ve been making my own pizza dough for many years and have cooked it outside on my gas grill. The dough recipe is one I found in Arthur Schwartz's book “Naples at Table.” While easy to make, occasionally when the dough bakes, it puffs up significantly and is too bready. In the last few years several artisanal pizza places have opened in my area such as Catbird Asbury Park, with its wood fired pizza, and Pizzeria Lucci of Belmar. I also enjoy DelPonte's Coal Fired Pizza in Bradley Beach. What these three restaurants have in common is a light tasting pizza, bakes up with a crisp bottom and obtains a nice brown color and charring.
To step up my game, I found a recipe by Dan Richer, owner of Razza Pizza Artigianale in Jersey City, NJ, posted on the website for Onni Pizza Ovens. When I made this recipe, I had 8-250g pizza portions. This recipe takes three days to make which also includes proofing time. In order to better comprehend how to prepare the dough, I found a video by Jon Crane where he demonstrates Mr. Richer's pizza dough method.
Here are a few takeaways I got from Mr. Richer's recipe as compared to Mr. Crane’s prep:
- “00” flour (Mr. Richer's choice) vs. Mr. Crane suggesting King Arthur All-Purpose or Bread Flour
- Friction factor - Mr. Richer says if you’re mixing by hand it’s close to 0 or barely a 1 or 2°F. Mr. Crane used a friction factor of 2 when kneading by hand.
- To calculate the friction factor for using a mixer, Mr. Richer gives instructions for doing this. Unfortunately, I got too wrapped up in wondering if I used more than the 680g of water the recipe called for and forgot to note the dough temperature.
- This is a high hydration dough, but for the 1000g of flour that you use, only 3g (1 teaspoon) of instant yeast is needed. When I made Arthur Schwartz’s recipe, it was 4 cups of flour with 2-1/2 teaspoons of yeast.
While this recipe takes time and patience, I think I’ve found my new pizza dough recipe. Although very sticky, I was able to make the dough work for me. I was, however, unable to cook the pizza on the grill grates. I adapted my baking by placing two bricks on the grill grates and topping with the pizza stone. When the dough firmed up a bit, using my pizza peel, I transferred it to the grill rack to finish cooking. The high hydration dough was much lighter tasting than my previous recipe.
Why is this dough better? “00” flour is a finely milled grind that is traditionally used for Neapolitan pizza dough. When baked at high temperatures it makes for a crispy crust and moderate chewiness. Also, the “00” grind allows for longer dough fermentation and crispy crust. The ratio of water to flour makes for larger pockets of air producing a lighter crust. I also learned that high hydration dough needs less yeast as it will obtain its spring from the steam released by the dough when baking.
My husband and I thoroughly enjoyed the pizza with this dough, but he would prefer it be stretched a little thinner.
By the way, I took a ride to Samaha's Farm in Aberdeen, NJ today and picked up a case of plum tomatoes to begin making my fresh tomato sauce that lasts all winter long. I still have a few jars left from last year, but I only plan on cooking two cases of tomatoes this year. Here’s a video of how I make my sauce.
Stuffed Long Hots
(Sausage and Cheese stuffed hot peppers
Recipe by Michele Di Pietro
From the website “Mangia with Michele”
Prep: 30 Minutes
Cook: 20 Minutes
Total Time: 50 Minutes
Servings: 8
Ingredients
8-10 long hot peppers, (about ¾-1-pound peppers)
¼ cup grated Pecorino Romano cheese , + (optionally) more for top/broiling
¼ cup fine, plain breadcrumbs , + (optionally) more for top/broiling
2 Tbsp chopped fresh parsley or basil , (optional)
Pinch ground black pepper
1-pound Italian sausage,, casings removed (hot or sweet–your preference)
1 cup shredded mozzarella, (about 4 ounces) + (optionally) more for top/broiling
½ cup chopped sun-dried tomatoes,, drained of any oil (about 3 ounces drained)
Extra virgin olive oil
Marinara or tomato basil sauce, or pesto (optional, for serving)
Instructions
- Place one rack on the bottom 1/3 of the oven and another rack under the broiler (for the optional finishing step). Preheat oven to 400˚F and use the convection setting if you have that available. Line a sheet pan with parchment paper and rub it with a little oil. Gather and prep all ingredients according to the specifications above.
- Prep the long hot peppers. Rinse and dry the peppers, then remove and discard the thick stem. Slice the peppers in half lengthwise and remove most seeds and big veins. You can either leave the pepper halves as is or cut them down further into smaller pieces. Small pieces are great for hors d’oeuvres! (See the photos above for both ways.) You may want to use gloves while removing the seeds and veins from the peppers. They are not super, super hot, but just be careful not to touch your eyes or sensitive parts of your face afterwards. 8-10 long hot peppers
- Next, combine the pecorino cheese, breadcrumbs, chopped herbs and black pepper in a small bowl and set it aside. ¼ cup grated Pecorino Romano cheese,¼ cup fine, plain breadcrumbs,2 Tbsp chopped fresh parsley or basil, inch ground black pepper
- Mix the bulk Italian sausage, shredded mozzarella and chopped sun-dried tomatoes in a bowl until well-combined. 1-pound Italian sausage,1 cup shredded mozzarella,½ cup chopped sun-dried tomatoes
- Stuff the hot peppers with the sausage mixture, using your hands or a small spoon. The stuffing does not need to be mounded high and the peppers do not need to be overfilled.
- Once all the peppers are stuffed, sprinkle the tops of each pepper with the breadcrumb/cheese mixture. Then, transfer them to the parchment-lined sheet pan in a single layer. Use two baking sheets if necessary.
- Once on the sheet pan, lightly drizzle each pepper with olive oil.
- Transfer the peppers to the oven and bake for about 20 minutes. If you’re not sure whether the sausage filling is cooked through, use a stem thermometer to check that it has reached an internal temperature of 165˚F.
- You can enjoy the peppers as is or, optionally, finish them under the broiler for 1 to 2 minutes with a bit more breadcrumbs and cheeses (mozzarella and pecorino) sprinkled over them. Be careful and stay close as to not burn the peppers!
- Transfer the finished stuffed hot peppers to a serving platter and serve alone or with some heated marinara sauce or pesto for dipping. Buon Appetito!
Dan Richer's Everyday Pizza Dough
Prep Time: 3 days total, including proofing time
Servings: Makes 7 balls weighing 250 grams each
Note
Ingredients
35 ounces (1000 grams) “00” flour (100%)
1 teaspoon (3 grams) instant yeast (0.3%)
3 cups (680 grams) water (68%) *If using a conventional oven, increase water to 760 grams, or 76% hydration
1 ½ tablespoons (20 grams) fine sea salt (2%)
Rice flour or fine semolina flour, for dusting
Method
1: If mixing by hand:
Incorporate the ingredients: In a large bowl, mix together the flour and yeast.
2: Rest the dough: Set aside, covered with a clean kitchen towel, for 20 minutes to one hour to hydrate the flour.
3: Incorporate the salt: Uncover the bowl.
Sprinkle the salt over the dough and use your fingers to scissor-pinch it into the mixture. (Dan recommends using your thumb and first finger to work the salt in from one side of the dough to the other.)
4: Knead: Once the salt is incorporated and dissolved, use four closed fingers (pinky to index) to mix without tearing, then press the dough gently onto itself.
Rotate the bowl a half turn and repeat. Next, rotate the bowl a quarter turn and repeat the lifting/pressing process, then rotate another half turn and repeat. The dough will tighten up and strengthen during this series of stretch and folds.
5: Covered with plastic wrap or a clean kitchen towel and set dough aside at room temperature for another 30 minutes.
Repeat the stretch and folds every 30 minutes. After 2 hours of bulk fermentation, the dough should feel as if gas is building up inside. It should also pass the windowpane test: Stretch the dough carefully between your fingers and hold it up to the light. If you can see light through the dough, the gluten structure is strong. If the dough tears, rest it for 30 minutes, then perform another set of stretch and folds.
6: Cover with plastic wrap and place in the refrigerator to rest overnight.
If it feels like there’s no gas production after 2 hours, set the bowl aside at room temperature until the dough has increased by at least 20 percent in volume before transferring to the refrigerator. Overnight, additional gas will develop.
7: If using a mixer: In the bowl of a stand mixer fitted with a dough hook, first add 85% of the water, followed by the flour and yeast.
Mix on a low speed until shaggy, then rest, covered, for 20 minutes to an hour. Incorporate the salt and continue mixing on a low speed until the dough is smooth and stretchy. Slowly add the remaining water. As soon as the water is fully incorporated, turn off the mixer. Transfer the dough to a very lightly oiled container and follow the recipe procedure above from the bulk ferment with stretch and fold steps.
8: Using a mixer can reduce the total number of stretch and folds required to reach the desired stage of gluten development, so you may only need to do one series.
Bulk fermentation is complete when the dough has increased in volume by at least 20 percent and passes the windowpane test (see above).
9: The next morning (or at least 12 hours later), remove the bowl from the refrigerator and uncover.
Stretch and fold the dough once more in the bowl; the dough will feel noticeably stronger. Cover with plastic wrap and return to the refrigerator.
10: Divide and round: Before bed (or at least 12 hours later), remove the bowl from the refrigerator and uncover.
Turn the dough out onto a lightly floured work surface, allowing it to gently release from the bowl.
11: Handle the dough with extreme care.
Using a dough scraper, cut the dough into seven equal pieces weighing about 250 grams each. If you are making a pan pie, cut the dough into two equal pieces weighing about 890 grams each.
12: Working with one piece of dough, lift the top half of the dough (from 12 o’clock) and press it into the center of the dough.
Next, lift the bottom half of the dough and press it into the center. Take the left side of the dough and lift and press it into the center. Repeat with the right side. Then, gather all four corners and pull and fold them into the center of the ball, then gently press to attach. Do not flatten. Be sure the ball is rounded and the bottom is sealed, pinching it closed if necessary. Gently flip the dough so the seam side faces down. Repeat this process with the remaining dough pieces. Place each ball into an individual, very lightly oiled plastic container large enough for the ball to double in volume. You can also place the balls on a lightly floured dough tray or baking sheet, dust their tops with flour, and cover with plastic wrap.
13: Proof: Transfer the dough to the refrigerator to rest overnight, or for at least 12 hours.
14: Bring the dough to room temperature: The next day, remove the dough from the refrigerator 2 to 3 hours before you plan to bake and set it aside to reach room temperature.
The dough should have substantially increased in volume while in the refrigerator. If it has not, allow it to increase in volume at room temperature before baking. The dough will be ready when it has increased in volume by 20 percent and passes the poke test. (This means it springs back slowly and leaves a slight indentation when poked.)
15: If cooking with an Ooni pizza oven: Aim for 950°F (500°C), using the Ooni Infrared Thermometer to quickly and accurately check the temperature of the baking stone.
If cooking with a home oven: Preheat your oven to its highest temperature.
16: Stretch: Flour the top of a dough ball.
If it is inside a container, turn the dough out onto a generously floured surface. If it is resting on a dough tray or baking sheet, gently place your non-dominant hand ron top of the floured dough ball, then use a dough scraper to scoop up the dough. Invert the dough and gently lower it onto a generously floured surface. Try not to damage any of the dough’s structure, and be as minimally invasive as possible. Keep track of the “top” and “bottom” of the dough. (The top of your future pizza is the side currently facing the countertop.) Using extremely gentle movements and keeping fingertips flat and spread, apply pressure on the dough at 10 and 2 o’clock. Reposition your hands on the portion of dough nearest you. Move from the top of the dough toward your body, pressing downward and outward with each motion. Leave an inch along the rim untouched.
17: Flip the dough over.
The top of the future pizza is now facing upward. Continue stretching the dough, using the technique that works best for you. One approach: Leave the dough on the counter and, with one hand in the center, pull at 3, 6, 9, and 12 o’clock. You might also scoop up the dough from underneath, keeping your palms facing the counter, then turn it, stretching and pulling it in increments using your knuckles. Be very gentle and don’t be afraid to rely on gravity, that great stretcher of pizza dough. Regardless of your technique, stretch the dough until it reaches 10 to 11 inches in diameter. You will do one final stretch once on the peel.
18: Transfer to the peel: Dust the peel with coarse rice flour and wipe your hands to remove any excess moisture.
Gently scoop up the dough, sliding your hands beneath it with palms facing the work surface. Shake off any excess flour and transfer the dough to the floured peel. Using flattened and spread fingertips, palms facing upward from underneath, gently pull the dough until the disc reaches 12 inches in diameter. Be sure your hands are dry when you do this, otherwise the dough will stick to the peel.
19: Build the pizza: Add your desired toppings.
20: For the bake: If cooking with an Ooni pizza oven: Slide the pizza off the peel and into your Ooni oven.
Cook for 1 to 2 minutes, turning the pizza regularly to ensure it cooks evenly.
If cooking with a home oven: Slide the pizza off the peel and into your oven and onto the tray/steel/pizza stone.
21: Dan suggests assessing your pizza according to his “Pizza Evaluation Rubric,” which provides an extensive checklist for pizza quality —one which can be referred to, and improved upon, following each bake.
22: Repeat with remaining dough balls, slice, serve and enjoy!
[1] From the website https://ooni.com/blogs/recipes/dan-richer-everyday-pizza-doug
Prep Time: 3 days total, including proofing time
Servings: Makes 7 balls weighing 250 grams each
Note
- Dan recommends a dough temperature of 78°F (25.5°C). To work out the ideal water temperature for achieving this, use this formula: (78°F x 3) − (Air Temperature + Flour Temperature + Friction Factor*) = Target Water Temperature (°F).
- *Friction factor is the heat generated through the action of kneading dough. How you knead the dough will have different friction factors, and therefore different dough temperatures: If you’re mixing by hand, the friction factor will be close to 0 (barely 1 or 2°F)
- If you’re using a mixer, depending on the brand, this can reach up to 40°F. To work out the friction factor of your mixer for a specific batch size, first mix the dough, then take the dough’s final temperature. Subtract the desired dough temperature (in this case, that’s 78°F) from the actual dough temperature, and the resulting figure will be the friction factor for that mixer and batch size.[1]
Ingredients
35 ounces (1000 grams) “00” flour (100%)
1 teaspoon (3 grams) instant yeast (0.3%)
3 cups (680 grams) water (68%) *If using a conventional oven, increase water to 760 grams, or 76% hydration
1 ½ tablespoons (20 grams) fine sea salt (2%)
Rice flour or fine semolina flour, for dusting
Method
1: If mixing by hand:
Incorporate the ingredients: In a large bowl, mix together the flour and yeast.
2: Rest the dough: Set aside, covered with a clean kitchen towel, for 20 minutes to one hour to hydrate the flour.
3: Incorporate the salt: Uncover the bowl.
Sprinkle the salt over the dough and use your fingers to scissor-pinch it into the mixture. (Dan recommends using your thumb and first finger to work the salt in from one side of the dough to the other.)
4: Knead: Once the salt is incorporated and dissolved, use four closed fingers (pinky to index) to mix without tearing, then press the dough gently onto itself.
Rotate the bowl a half turn and repeat. Next, rotate the bowl a quarter turn and repeat the lifting/pressing process, then rotate another half turn and repeat. The dough will tighten up and strengthen during this series of stretch and folds.
5: Covered with plastic wrap or a clean kitchen towel and set dough aside at room temperature for another 30 minutes.
Repeat the stretch and folds every 30 minutes. After 2 hours of bulk fermentation, the dough should feel as if gas is building up inside. It should also pass the windowpane test: Stretch the dough carefully between your fingers and hold it up to the light. If you can see light through the dough, the gluten structure is strong. If the dough tears, rest it for 30 minutes, then perform another set of stretch and folds.
6: Cover with plastic wrap and place in the refrigerator to rest overnight.
If it feels like there’s no gas production after 2 hours, set the bowl aside at room temperature until the dough has increased by at least 20 percent in volume before transferring to the refrigerator. Overnight, additional gas will develop.
7: If using a mixer: In the bowl of a stand mixer fitted with a dough hook, first add 85% of the water, followed by the flour and yeast.
Mix on a low speed until shaggy, then rest, covered, for 20 minutes to an hour. Incorporate the salt and continue mixing on a low speed until the dough is smooth and stretchy. Slowly add the remaining water. As soon as the water is fully incorporated, turn off the mixer. Transfer the dough to a very lightly oiled container and follow the recipe procedure above from the bulk ferment with stretch and fold steps.
8: Using a mixer can reduce the total number of stretch and folds required to reach the desired stage of gluten development, so you may only need to do one series.
Bulk fermentation is complete when the dough has increased in volume by at least 20 percent and passes the windowpane test (see above).
9: The next morning (or at least 12 hours later), remove the bowl from the refrigerator and uncover.
Stretch and fold the dough once more in the bowl; the dough will feel noticeably stronger. Cover with plastic wrap and return to the refrigerator.
10: Divide and round: Before bed (or at least 12 hours later), remove the bowl from the refrigerator and uncover.
Turn the dough out onto a lightly floured work surface, allowing it to gently release from the bowl.
11: Handle the dough with extreme care.
Using a dough scraper, cut the dough into seven equal pieces weighing about 250 grams each. If you are making a pan pie, cut the dough into two equal pieces weighing about 890 grams each.
12: Working with one piece of dough, lift the top half of the dough (from 12 o’clock) and press it into the center of the dough.
Next, lift the bottom half of the dough and press it into the center. Take the left side of the dough and lift and press it into the center. Repeat with the right side. Then, gather all four corners and pull and fold them into the center of the ball, then gently press to attach. Do not flatten. Be sure the ball is rounded and the bottom is sealed, pinching it closed if necessary. Gently flip the dough so the seam side faces down. Repeat this process with the remaining dough pieces. Place each ball into an individual, very lightly oiled plastic container large enough for the ball to double in volume. You can also place the balls on a lightly floured dough tray or baking sheet, dust their tops with flour, and cover with plastic wrap.
13: Proof: Transfer the dough to the refrigerator to rest overnight, or for at least 12 hours.
14: Bring the dough to room temperature: The next day, remove the dough from the refrigerator 2 to 3 hours before you plan to bake and set it aside to reach room temperature.
The dough should have substantially increased in volume while in the refrigerator. If it has not, allow it to increase in volume at room temperature before baking. The dough will be ready when it has increased in volume by 20 percent and passes the poke test. (This means it springs back slowly and leaves a slight indentation when poked.)
15: If cooking with an Ooni pizza oven: Aim for 950°F (500°C), using the Ooni Infrared Thermometer to quickly and accurately check the temperature of the baking stone.
If cooking with a home oven: Preheat your oven to its highest temperature.
16: Stretch: Flour the top of a dough ball.
If it is inside a container, turn the dough out onto a generously floured surface. If it is resting on a dough tray or baking sheet, gently place your non-dominant hand ron top of the floured dough ball, then use a dough scraper to scoop up the dough. Invert the dough and gently lower it onto a generously floured surface. Try not to damage any of the dough’s structure, and be as minimally invasive as possible. Keep track of the “top” and “bottom” of the dough. (The top of your future pizza is the side currently facing the countertop.) Using extremely gentle movements and keeping fingertips flat and spread, apply pressure on the dough at 10 and 2 o’clock. Reposition your hands on the portion of dough nearest you. Move from the top of the dough toward your body, pressing downward and outward with each motion. Leave an inch along the rim untouched.
17: Flip the dough over.
The top of the future pizza is now facing upward. Continue stretching the dough, using the technique that works best for you. One approach: Leave the dough on the counter and, with one hand in the center, pull at 3, 6, 9, and 12 o’clock. You might also scoop up the dough from underneath, keeping your palms facing the counter, then turn it, stretching and pulling it in increments using your knuckles. Be very gentle and don’t be afraid to rely on gravity, that great stretcher of pizza dough. Regardless of your technique, stretch the dough until it reaches 10 to 11 inches in diameter. You will do one final stretch once on the peel.
18: Transfer to the peel: Dust the peel with coarse rice flour and wipe your hands to remove any excess moisture.
Gently scoop up the dough, sliding your hands beneath it with palms facing the work surface. Shake off any excess flour and transfer the dough to the floured peel. Using flattened and spread fingertips, palms facing upward from underneath, gently pull the dough until the disc reaches 12 inches in diameter. Be sure your hands are dry when you do this, otherwise the dough will stick to the peel.
19: Build the pizza: Add your desired toppings.
20: For the bake: If cooking with an Ooni pizza oven: Slide the pizza off the peel and into your Ooni oven.
Cook for 1 to 2 minutes, turning the pizza regularly to ensure it cooks evenly.
If cooking with a home oven: Slide the pizza off the peel and into your oven and onto the tray/steel/pizza stone.
21: Dan suggests assessing your pizza according to his “Pizza Evaluation Rubric,” which provides an extensive checklist for pizza quality —one which can be referred to, and improved upon, following each bake.
22: Repeat with remaining dough balls, slice, serve and enjoy!
[1] From the website https://ooni.com/blogs/recipes/dan-richer-everyday-pizza-doug