 Donna Walsifer
sweet and savory
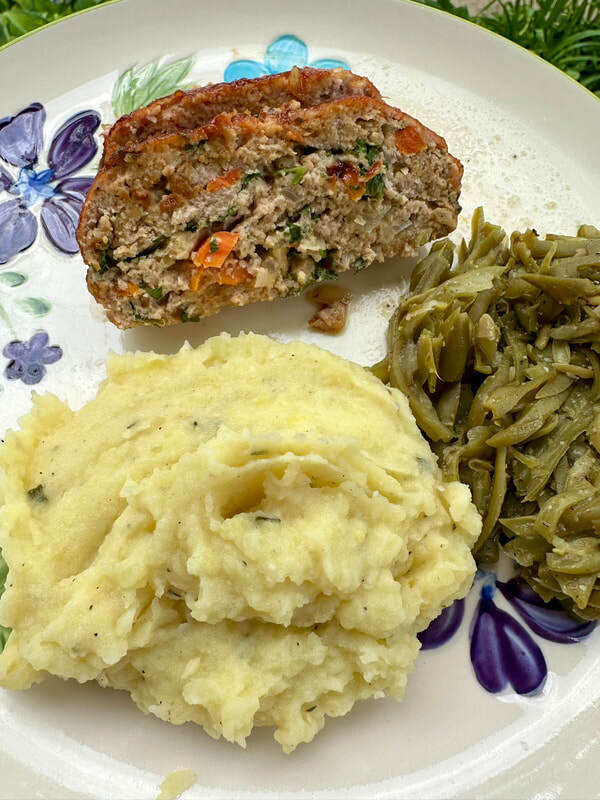
My husband loves both stir fry meals and meatloaf. I have made my fair share of meatloaves and shared the results on this website. I recently started listening to a podcast called “The Recipe,” hosted by recipe developers/food bloggers/cookbook writers Deb Perelman and J. Kenji Alt-Lopez. Ms. Perelman has a blog called “Smitten Kitchen” and you can find Mr. Alt-Lopez’s recipes on the website “Serious Eats,” his YouTube channel and The New York Times/NYT Cooking (both are paid subscriptions).
In a podcast posted in March of this year, Deb and Kenji had a discussion about meat loaf. In the podcast notes, a link was given for her recipe for Turkey Meat Loaf for Skeptics. Two things that drew me to this recipe was the fact that it used ground turkey and vegetables that infuse both flavor and moisture to the meat. For the recipe you’ll need a yellow onion, a garlic clove, a carrot, olive oil, kosher salt, freshly ground black pepper, panko-style bread crumbs, chicken broth, tomato paste, Dijon mustard, Worcestershire sauce, fresh flat-leaf parsley, an egg and one pound ground turkey (light and dark meat or just dark meat). There’s also a glaze for the turkey that consists of ketchup, molasses, apple-cider vinegar, hot sauce, Worcestershire sauce, kosher salt and freshly ground pepper.
In a podcast posted in March of this year, Deb and Kenji had a discussion about meat loaf. In the podcast notes, a link was given for her recipe for Turkey Meat Loaf for Skeptics. Two things that drew me to this recipe was the fact that it used ground turkey and vegetables that infuse both flavor and moisture to the meat. For the recipe you’ll need a yellow onion, a garlic clove, a carrot, olive oil, kosher salt, freshly ground black pepper, panko-style bread crumbs, chicken broth, tomato paste, Dijon mustard, Worcestershire sauce, fresh flat-leaf parsley, an egg and one pound ground turkey (light and dark meat or just dark meat). There’s also a glaze for the turkey that consists of ketchup, molasses, apple-cider vinegar, hot sauce, Worcestershire sauce, kosher salt and freshly ground pepper.
The vegetables are sautéed in olive oil until just brown then transferred to a large bowl. To the veggies you add breadcrumbs, broth, tomato paste, mustard, Worcestershire sauce, parsley, kosher salt and pepper. The meat is formed into a 4-inch x 8-inch loaf and placed on a baking dish or small sheet pan. The glaze ingredients are combined together and brushed on the meat loaf before baking.
Well, the meat loaf was a hit, to quote my husband, “It’s my new favorite!” The meat loaf was moist, tender and flavorful. The glaze added another dimension to the taste and complemented the meat perfectly. I also served mashed potatoes and string beans from a recipe from High Cotton BBQ in Kitty Hawk, NC. The restaurant was kind enough to share the “no recipe recipe” with me. They use canned string beans that are seasoned with butter, black pepper, and a small amount of garlic salt. Let’s just say there’s lots of butter and lots of freshly ground pepper that makes these canned string beans fabulous. In lieu of garlic salt, I used garlic powder and kosher salt.
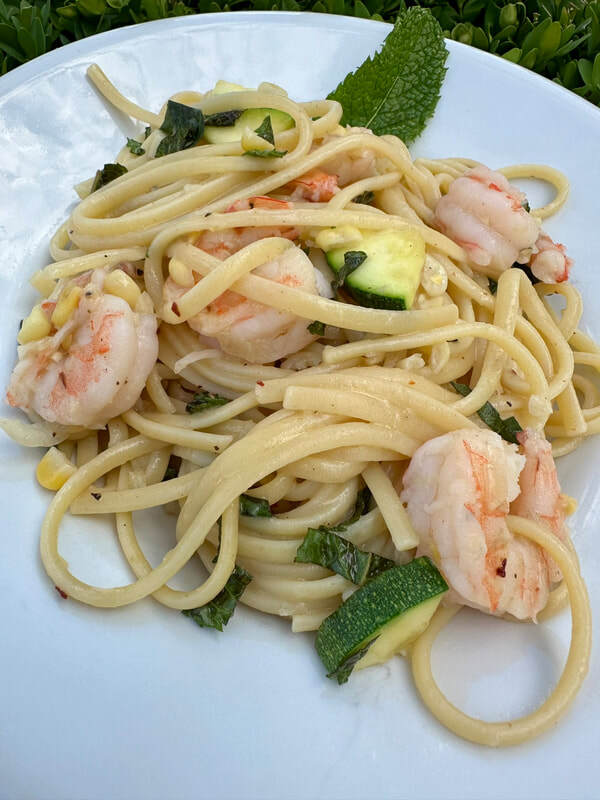
In a recent CSA box, I had a couple of zucchinis. As my husband is such a pasta lover, I found a recipe by Dan Pelosi on The New York Times/NYT Cooking website for Linguine with Zucchini, Corn and Shrimp. I used blanched and frozen corn kernels from last summer that I had in my freezer along with my North Carolina shrimp from O’Neal’s Sea Harvest. In addition to the ingredients listed in the recipe title, you’ll also need kosher salt, black pepper, unsalted butter, olive oil, shallot or onion, red pepper flakes, fresh mint for garnish and fresh basil for garnish.
The shrimp needs to be peeled and deveined, patted dry and seasoned with salt. In a large pot (I used a stainless skillet), the shrimp are sautéed in a mix of butter and olive oil and cooked until just opaque. The shrimp are removed and the garlic and shallot (seasoned with salt, pepper and red pepper flakes) are cooked until translucent. The zucchini is added and cooked. More oil is added, along with a pinch of salt and the corn added and cooked until warmed through. The recipe stressed that the vegetables should be crisp, not overcooked.
Once the pasta was done, I drained it and put it back in its pot along with the sautéed vegetables, shrimp, some reserved pasta water and butter. I briskly stirred the pasta to create an emulsion for a glossy sauce. Just before serving I added some chopped fresh basil and a bit of chopped mint. Yum…what a tasty dish. Although there was no red sauce, my husband, and I, really enjoyed this dish. The corn still had that summertime flavor, the vegetables were crisp tender and the red pepper flakes added a touch of spice. Overall, a delicious and light tasting pasta.
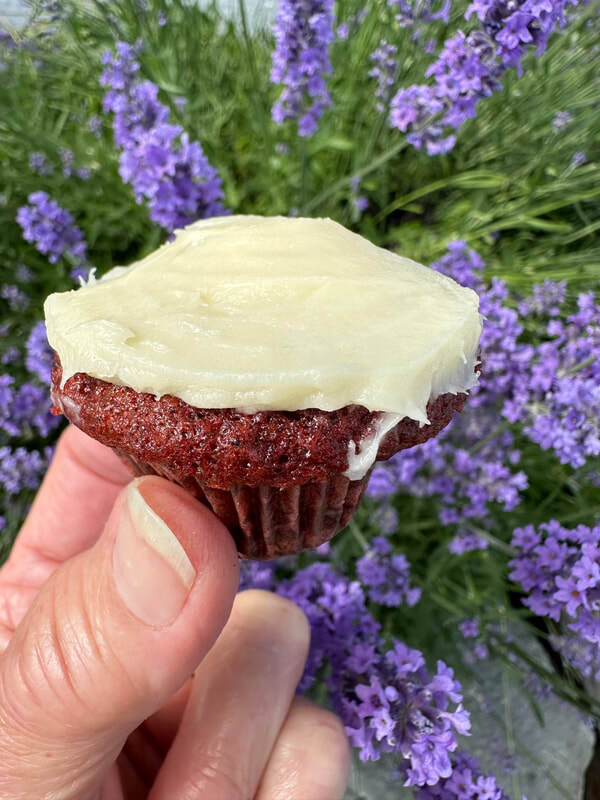
I love red velvet cake and my granddaughters love it too. My oldest granddaughter was recently remembering about the mini cupcakes I used to bring her when I worked in our town’s local tea room. I was about to call the shop to order when I decided to make my own mini cupcakes.
Two weeks ago, my husband picked up the weekend edition of The Wall Street Journal and in the “Eating & Drinking” column was a recipe for Red Velvet Cupcakes by Vallery Lomas. Miss Lomas also contributes to The New York Times/NYT Cooking, Epicurious website and is on Instagram at “foodieinnewyork.”
The recipe also calls for natural or Dutch process cocoa powder, kosher salt, vegetable oil, granulated sugar, egg, vanilla, red gel food coloring or red liquid food coloring, buttermilk, baking soda and fresh lemon juice or vinegar. It’s the cream cheese frosting that puts red velvet cake over the top. For the frosting you’ll need cream cheese, unsalted butter, vanilla and powdered sugar. Instead of using red gel food coloring or red liquid food color, I used Red Velvet Bakery Emulsion by LorAnn, a maker of flavorings, essential oils and specialty ingredients. You can purchase at Amazon or Michael’s craft stores, which is where I get it.
The recipe makes 24 full size cupcakes, but I decided to make half a recipe and was able to make 30 mini cupcakes, which is the perfect snack size. The cupcakes were scrumptious. The crumb texture was tender and moist and the cream cheese frosting wasn’t overly sweet, it was a perfect balance between the amount of cream cheese called for to powdered sugar. Although, I made 30 cupcakes, I kept a dozen at my house for when my granddaughters visit in the coming weeks.
Well, the meat loaf was a hit, to quote my husband, “It’s my new favorite!” The meat loaf was moist, tender and flavorful. The glaze added another dimension to the taste and complemented the meat perfectly. I also served mashed potatoes and string beans from a recipe from High Cotton BBQ in Kitty Hawk, NC. The restaurant was kind enough to share the “no recipe recipe” with me. They use canned string beans that are seasoned with butter, black pepper, and a small amount of garlic salt. Let’s just say there’s lots of butter and lots of freshly ground pepper that makes these canned string beans fabulous. In lieu of garlic salt, I used garlic powder and kosher salt.
In a recent CSA box, I had a couple of zucchinis. As my husband is such a pasta lover, I found a recipe by Dan Pelosi on The New York Times/NYT Cooking website for Linguine with Zucchini, Corn and Shrimp. I used blanched and frozen corn kernels from last summer that I had in my freezer along with my North Carolina shrimp from O’Neal’s Sea Harvest. In addition to the ingredients listed in the recipe title, you’ll also need kosher salt, black pepper, unsalted butter, olive oil, shallot or onion, red pepper flakes, fresh mint for garnish and fresh basil for garnish.
The shrimp needs to be peeled and deveined, patted dry and seasoned with salt. In a large pot (I used a stainless skillet), the shrimp are sautéed in a mix of butter and olive oil and cooked until just opaque. The shrimp are removed and the garlic and shallot (seasoned with salt, pepper and red pepper flakes) are cooked until translucent. The zucchini is added and cooked. More oil is added, along with a pinch of salt and the corn added and cooked until warmed through. The recipe stressed that the vegetables should be crisp, not overcooked.
Once the pasta was done, I drained it and put it back in its pot along with the sautéed vegetables, shrimp, some reserved pasta water and butter. I briskly stirred the pasta to create an emulsion for a glossy sauce. Just before serving I added some chopped fresh basil and a bit of chopped mint. Yum…what a tasty dish. Although there was no red sauce, my husband, and I, really enjoyed this dish. The corn still had that summertime flavor, the vegetables were crisp tender and the red pepper flakes added a touch of spice. Overall, a delicious and light tasting pasta.
I love red velvet cake and my granddaughters love it too. My oldest granddaughter was recently remembering about the mini cupcakes I used to bring her when I worked in our town’s local tea room. I was about to call the shop to order when I decided to make my own mini cupcakes.
Two weeks ago, my husband picked up the weekend edition of The Wall Street Journal and in the “Eating & Drinking” column was a recipe for Red Velvet Cupcakes by Vallery Lomas. Miss Lomas also contributes to The New York Times/NYT Cooking, Epicurious website and is on Instagram at “foodieinnewyork.”
The recipe also calls for natural or Dutch process cocoa powder, kosher salt, vegetable oil, granulated sugar, egg, vanilla, red gel food coloring or red liquid food coloring, buttermilk, baking soda and fresh lemon juice or vinegar. It’s the cream cheese frosting that puts red velvet cake over the top. For the frosting you’ll need cream cheese, unsalted butter, vanilla and powdered sugar. Instead of using red gel food coloring or red liquid food color, I used Red Velvet Bakery Emulsion by LorAnn, a maker of flavorings, essential oils and specialty ingredients. You can purchase at Amazon or Michael’s craft stores, which is where I get it.
The recipe makes 24 full size cupcakes, but I decided to make half a recipe and was able to make 30 mini cupcakes, which is the perfect snack size. The cupcakes were scrumptious. The crumb texture was tender and moist and the cream cheese frosting wasn’t overly sweet, it was a perfect balance between the amount of cream cheese called for to powdered sugar. Although, I made 30 cupcakes, I kept a dozen at my house for when my granddaughters visit in the coming weeks.
Turkey Meatloaf for Skeptics
From “Smitten Kitchen Keepers,” by Deb Perelman
Servings: 4
Prep Time: 25 minutes
Bake Time: 35 minutes
”Note: This is a small-sized meatloaf, and it works for my family of four. It doubles easily, either as two small loaves (baking time the same) or one larger, freeform loaf that will take between 60 and 70 minutes in the oven.”
Ingredients
Meatloaf
1 medium yellow onion, roughly chopped
1 garlic clove, smashed
1 slim carrot, roughly chopped
Olive oil
Kosher salt and freshly ground black pepper
1/2 cup (30 grams) panko-style breadcrumbs
1/4 cup (60 grams) chicken broth
1 1/2 teaspoons tomato paste
1 teaspoon Dijon mustard
1 tablespoon (15 grams) Worcestershire sauce
2 tablespoons chopped fresh flat-leaf parsley
1 large egg
1 pound (455 grams) ground turkey, preferably a mix of dark and light meat, or just dark
Glaze
1 heaped (20 grams) tablespoon ketchup
1 tablespoon molasses
1 tablespoon (15 grams) apple-cider vinegar
1 teaspoon hot sauce of your choice (optional)
1 teaspoon Worcestershire sauce
Kosher salt and freshly ground black pepper, to taste
Heat the oven: To 350°F (175°C).
Prepare the meatloaf: Lightly coat a 9-by-13-inch baking dish or small sheet pan with nonstick spray. Very finely dice the onion, garlic, and carrot in a food processor, or by hand on a cutting board. Heat a large skillet over medium heat. Once the skillet is hot, coat the bottom with olive oil, and heat it for a minute; then add the vegetables. Season with salt and pepper, and cook, stirring frequently, until they begin to brown, about 7 to 10 minutes; transfer them to a large bowl.
Add the breadcrumbs, broth, tomato paste, mustard, Worcestershire, parsley, 1 teaspoon salt, and ½ teaspoon pepper, and stir to combine. Add the egg by beating it directly into the vegetable mixture (I like to use a fork). Add the turkey, and combine just until the vegetable-egg mixture is dispersed through the meat. Pat the turkey mixture into about a 4-by-8-inch shape in your prepared pan.
Make the glaze: In a small bowl, combine the glaze ingredients. Brush or spoon the glaze over the meatloaf.
Bake: Bake the meatloaf for 30 to 35 minutes, until the internal temperature is 160°F (70°C). If you don’t have a thermometer, you can insert a knife into the center and hold it there for 10 seconds. You should feel no resistance, and when you pull it out, the blade should feel hot.
Let the meatloaf rest for 5 minutes, then cut it into 1-inch slices to serve.
Linguine With Zucchini, Corn and Shrimp
By Dan Pelosi
The New York Times/NYT Cooking
Published May 30, 2024
Total Time: 30 minutes
Prep Time: 10 minutes
Cook Time: 20 minutes
Servings: 4 to 6
Ingredients
Kosher salt and black pepper
1-pound linguine or other long pasta
1-pound medium shrimp, peeled, deveined and tails removed (about 20 shrimp)
4 tablespoons unsalted butter
4 tablespoons olive oil
6 garlic cloves, minced
1 medium shallot or ½ medium onion, minced
Red-pepper flakes
1 large zucchini, cut into ¼-inch rounds, then each round cut into quarters
2 cups corn kernels (2 to 3 large ears)
¼ cup chopped fresh mint, for garnishing
¼ cup chopped fresh basil, for garnishing
Preparation
- In a large pasta pot, bring salted water to a boil. Add pasta and cook according to the packaging directions until al dente. Reserve 1 cup of pasta water, then drain the pasta and return it to the pot.
- Meanwhile, pat the shrimp dry with a paper towel and season with salt. In a separate large pot, melt 2 tablespoons of butter into 2 tablespoons of olive oil over medium high. Add shrimp in a single layer and cook until just opaque, about 2 minutes per side. Use tongs or a slotted spoon to extract shrimp and set aside.
- Maintaining medium-high heat, add the garlic, shallot and a pinch each of salt, black pepper and red pepper, stirring constantly until the garlic is fragrant and shallot is translucent, about 3 minutes. Add zucchini and cook, stirring occasionally, for about 4 minutes. Add corn along with the remaining 2 tablespoons olive oil and a pinch of salt; stir to coat. Cook until the corn is bright yellow and warm, about 2 minutes. Be careful not to overcook the vegetables, they should maintain their crispness.
- Add pasta to the pot with the vegetables, followed by the shrimp, ½ cup of the reserved pasta water and the remaining 2 tablespoons of butter. Stir to combine, reheating the shrimp while creating a glossy sauce, for about 90 seconds. Remove from heat and add chopped mint and basil and stir. Adjust seasonings to taste. Serve immediately.
Red Velvet Cupcakes
“The Best Red-Velvet Cupcake Recipe for Summer Barbecues, Picnics and Celebrations,”
By Vallery Lomas
The Wall Street Journal/Arts &Culture/Food & Cooking, June 1-2, 2024
Total Time: 1 hour, 15 minutes
Makes: 24 cupcakes
Tips for Success
Cooking spray is your friend. Lightly spray the inside of the cupcake liners with cooking spray to ensure your cupcakes can be smoothly removed from the liner and to prevent clingy crumbs.
Spoon and level. Measure the flour and cocoa precisely by spooning each into a measuring cup until it overflows slightly, then leveling the top with the back of a knife
Don’t forget to sift. Cake flour and cocoa powder clump. Sifting prevents that and makes them combine easily. I simply sift through a fine-mesh strainer into a bowl.
Ingredients
For the cupcakes:
2½ cups cake flour
3 tablespoons natural unsweetened or Dutch process cocoa powder
1 teaspoon kosher salt
1½ cups vegetable oil
1½ cups granulated sugar
2 large eggs at room temperature
2 teaspoons vanilla extract
½ teaspoon red gel food coloring or 2 teaspoons red liquid food coloring
1 cup buttermilk
1 teaspoon baking soda
1½ teaspoons fresh lemon juice or vinegar
For the frosting:
8 ounces cream cheese, softened
1 stick (½ cup) unsalted butter
1 teaspoon vanilla extract
5 cups powdered sugar
Directions
- Heat oven to 350 degrees and place a rack in middle position. Line two standard-size cupcake pans (12 cavities per pan) with cupcake liners.
- Sift cake flour and cocoa powder into a large bowl. Add salt and whisk to combine. Set aside.
- Use a mixer with paddle attachment to beat oil and sugar together on medium speed. Add eggs, one at a time, beating to incorporate before adding the next. Add vanilla and food coloring, and mix to combine.
- Reduce mixer speed to low, add a third of the flour mixture and mix well. Add half the buttermilk and mix well. Add half remaining flour mixture and continue to mix on low. Add remaining buttermilk and mix until well combined. Add remaining flour mixture. Scrape sides and bottom of bowl and mix well. Batter will be very loose.
- In a small bowl, combine baking soda and lemon juice. Add to batter and mix on medium until just combined. Batter will gently burp bubbles. Divide batter evenly, filling each cupcake liner ¾ full.
- Bake until a tester inserted in middle comes out clean, 18-20 minutes. Set pans on a rack to cool completely, 30 minutes.
- Make the frosting: In a mixing bowl, combine cream cheese, butter and vanilla extract. Beat with paddle attachment on high speed until creamy and smooth. Sift in powdered sugar. Beat on low until combined, increase speed to medium and beat until smooth, about 2 minutes. Transfer to a piping bag and pipe frosting onto cooled cupcakes. Or, spoon frosting on top. Serve immediately, or store in refrigerator in an airtight container up to one week. Serve at room temperature.