 Donna Walsifer
being alive

“May, more than any other month of the year, wants us to feel most alive.”— Fennel Hudson
Now that the weather has improved, don’t you feel more alive, energetic? I feel that way about cooking, fresh garden vegetables are becoming available, time to try variations on familiar vegetables. That being said, I picked up a bunch of radishes at the Asbury Fresh Farmers & Makers Market in Asbury Park. The produce at Rolling Hills Farm is always beautiful.
The reason for the radishes was I had a package of Alexian Pâtés’ Sage and Pork Mousse with Vermouth and was undecided on serving ideas. This is a creamy and spreadable mousse with hints of sage and subtle notes of delicate herbs. There’s a richness to the mousse that I felt needed a counterpart. I debated various preparations but finally settled on pickled radishes. I thought
the radishes would cut through the richness, yet complement the mousse and I found a recipe on the website “Cookie + Kate.” For the recipe you’ll need one bunch of radishes, white wine vinegar or apple cider vinegar, water, honey or maple syrup, salt, red pepper flakes (if you like spicy food, optional), whole mustard seeds (optional) and optional add-ins such as garlic cloves, black peppercorns, fennel seeds or coriander seeds. For my purpose, I went with black peppercorns.
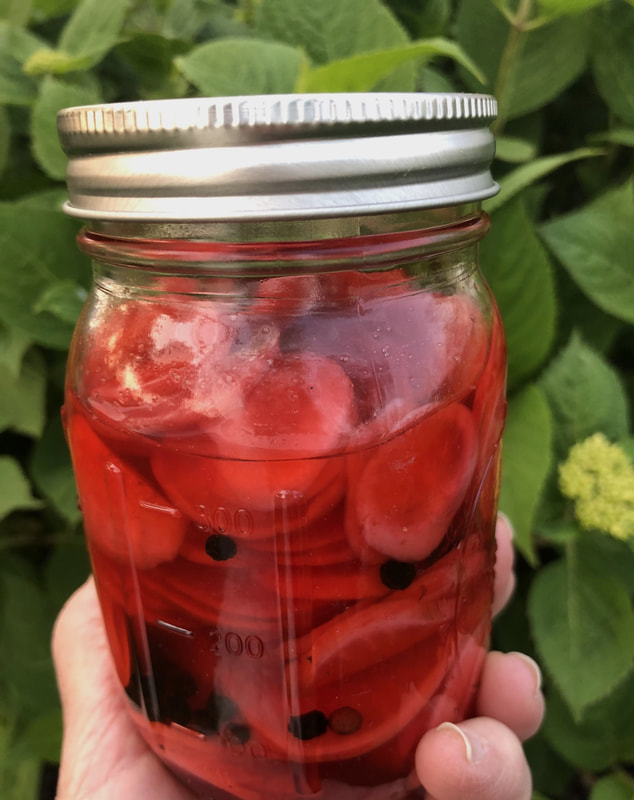
The preparation is very easy; it helps if you have a mandoline. I like my OXO Simple Mandoline, it’s easy to use and cleans up wonderfully. The mandoline makes sure each slice of radish is the same thickness. I used it to slice off the bottoms and tops of the radish then made thin rounds. I put the radish slices in a pint mason jar. The brine consists of vinegar, water, honey (my choice), salt and approximately 1/2 to 3/4 teaspoon of black peppercorns. The mixture is brought to a boil then poured over the radishes.
Next comes the carrier for the mousse. Alexian sells their own crackers with flavors such as Olive Oil & Sea Salt, Rosemary & Olive Oil and Cracked Peppercorn. For one serving idea I used their Olive Oil & Sea Salt; the other I made little pâte à choux puffs. I removed a portion of the spread from the package and stirred with a fork until the mousse until it was softer and easier to spread. The mousse was spread on the crackers and on each of the puffs. For garnish, I used sliced cornichons, minced chives and chive blossoms, sliced petite heirloom tomatoes and my pickled radishes.
Yum, what an easy and delicious snack or hors d'oeuvre for guests. Both My husband and neighbor both loved them. The pickled radishes were a big hit on their own. With the official start of summer in a mere few weeks, this is an easy to make snack for yourself or guests.
Spicy Quick Pickled Radishes
Recipe adapted from The First Mess and Bon Appetit.
From the website “Cookie and Kate”
Prep time: 10 minutes Cook time: 2 minutes
Total time: 12 minutes Yield: 1-1/4 cups
Ingredients
1 bunch radishes
¾ cup white wine vinegar or apple cider vinegar
¾ cup water
3 tablespoons honey or maple syrup
2 teaspoons salt
1 teaspoon red pepper flakes (this yields very spicy pickles, so use ½ teaspoon for medium spicy pickles or none at all)
½ teaspoon whole mustard seeds (optional)
Optional add-ins: garlic cloves, black peppercorns, fennel seeds, coriander seeds
Instructions
Notes from “Cookie and Kate”
MAKE IT VEGAN: Substitute maple syrup or agave nectar for the honey.
CHANGE IT UP: To the best of my knowledge, you can pickle any thinly sliced vegetables in this manner. Try carrot ribbons, cucumbers, red onions, cabbage and/or fennel! The thinner you slice the vegetables, the faster they absorb the vinegar solution and taste like pickles.
THAT JAR, THOUGH! It’s a Weck jar. You can buy them on Crate and Barrel’s website (affiliate link).
CAN I CAN IT? No. This recipe is a “refrigerator pickle” recipe. It is not designed for canning in a water bath, and it has not been tested for canning safety. Please do not attempt! Follow a recipe specifically designed for canning instead.
Recipe adapted from The First Mess and Bon Appetit.
From the website “Cookie and Kate”
Prep time: 10 minutes Cook time: 2 minutes
Total time: 12 minutes Yield: 1-1/4 cups
Ingredients
1 bunch radishes
¾ cup white wine vinegar or apple cider vinegar
¾ cup water
3 tablespoons honey or maple syrup
2 teaspoons salt
1 teaspoon red pepper flakes (this yields very spicy pickles, so use ½ teaspoon for medium spicy pickles or none at all)
½ teaspoon whole mustard seeds (optional)
Optional add-ins: garlic cloves, black peppercorns, fennel seeds, coriander seeds
Instructions
- To prepare the radishes: Slice off the tops and bottoms of the radishes, then use a sharp chef’s knife or mandoline to slice the radishes into very thin rounds. Pack the rounds into a pint-sized canning jar. Top the rounds with red pepper flakes and mustard seeds.
- To prepare the brine: In a small saucepan, combine the vinegar, water, honey or maple syrup and salt. Bring the mixture to a boil, stirring occasionally, then pour the mixture over the radishes.
- Let the mixture cool to room temperature. You can serve the pickles immediately or cover and refrigerate for later consumption. The pickles will keep well in the refrigerator for several weeks, although they are in their most fresh and crisp state for about 5 days after pickling.
Notes from “Cookie and Kate”
MAKE IT VEGAN: Substitute maple syrup or agave nectar for the honey.
CHANGE IT UP: To the best of my knowledge, you can pickle any thinly sliced vegetables in this manner. Try carrot ribbons, cucumbers, red onions, cabbage and/or fennel! The thinner you slice the vegetables, the faster they absorb the vinegar solution and taste like pickles.
THAT JAR, THOUGH! It’s a Weck jar. You can buy them on Crate and Barrel’s website (affiliate link).
CAN I CAN IT? No. This recipe is a “refrigerator pickle” recipe. It is not designed for canning in a water bath, and it has not been tested for canning safety. Please do not attempt! Follow a recipe specifically designed for canning instead.
Pâte à Choux
By Daniel Gritzer
From the website www.seriouseats.com
Cook time: 20 Minutes Total Time: 20 minutes
Active time: 20 Minutes Serves: 18 puffs
Ingredients
1 cup (235g) water or milk (see note)
6 tablespoons (84g) unsalted butter, cut into 1/2-inch cubes
2 teaspoons (8g) sugar (optional; see note)
1/2 teaspoon (2g) Diamond Crystal kosher salt; for table salt use half as much by volume or the same weight
4 1/2 ounces (128g) all-purpose flour, sifted
4 large eggs (200g)
Directions
Special Equipment
3-quart saucier or saucepan, stand mixer, pastry bag and tip
Water or milk work in this recipe. Because of the richness of the cheese in the choux pastry, water is more than sufficient here; milk, meanwhile, will lead to deeper browning during baking.
If you want to make sure that each puff is the right size, you can prepare a template ahead of time. Take one sheet of parchment paper and, using a 1 1/2-inch round cutter as a guide, trace circles, then flip paper upside down and set it on the baking sheet.
Make-Ahead and Storage The baked gougères can be refrigerated in an airtight container for up to 3 days or, wrapped tightly in plastic and kept in an airtight container, they can be frozen for up to 1 month. To refresh refrigerated or frozen gougères, transfer to a baking sheet and reheat in a 350°F (177°C) oven until crisp, about 5 minutes.
By Daniel Gritzer
From the website www.seriouseats.com
Cook time: 20 Minutes Total Time: 20 minutes
Active time: 20 Minutes Serves: 18 puffs
Ingredients
1 cup (235g) water or milk (see note)
6 tablespoons (84g) unsalted butter, cut into 1/2-inch cubes
2 teaspoons (8g) sugar (optional; see note)
1/2 teaspoon (2g) Diamond Crystal kosher salt; for table salt use half as much by volume or the same weight
4 1/2 ounces (128g) all-purpose flour, sifted
4 large eggs (200g)
Directions
- In a 3-quart stainless-steel saucier or saucepan, combine water (or milk), butter, sugar (if using), and salt.
- Set over high and cook until liquid comes to a rolling boil and butter has fully melted, about 2 minutes (the small butter cubes should be fully melted just about at the same time the liquid hits a strong boil).
- Remove from heat and add flour. Using a wooden spoon or stiff silicone spatula, thoroughly mix in flour until no lumps remain (make sure to hunt down and smash out any stubborn ones).
- Return saucepan to medium-high heat and cook, stirring very frequently, until dough registers 175°F (80°C) on an instant-read thermometer; if you don't have a thermometer, other signs the dough is ready include a thin starchy film forming all over the inside of the saucier and the dough pulling together into a cohesive mass.
- To use a stand mixer: Transfer dough to a stand mixer fitted with the paddle and beat at medium speed until dough registers 145°F on an instant-read thermometer (you need the dough cool enough that it doesn't cook the eggs when they hit it).
- Add eggs one at a time, making sure each is fully beaten into the dough before adding the next; it can help to start the mixer at medium-low speed for the first egg and then increase the speed to medium once the choux batter begins to develop.
- Scrape down sides of mixer bowl, then mix once more at medium speed just to ensure the choux batter is fully mixed, about 5 seconds.
- Alternatively, to incorporate eggs by hand: Let dough cool in saucepan, stirring frequently, until it registers 145°F on an instant-read thermometer. Add eggs 1 at a time, stirring well between additions until each egg is fully incorporated before adding the next, until a smooth, shiny paste forms.
- Use choux right away, or hold at room temperature for up to 2 hours before using; how you use the choux will depend on the application, though it’s important to prevent a skin from forming, either by transferring the choux right away to a pastry or zipper-lock bag and keeping it sealed, or pressing plastic wrap directly against the choux’s surface.
- To Bake: Adjust oven rack to middle position and preheat oven to 400°F (200°C). Line a rimmed baking sheet with parchment paper. If desired, pipe a dab of gougères batter under each of the 4 corners of the parchment to secure it in place.
- Pipe gougères batter onto parchment paper in 1 1/2-inch mounds. You should have enough batter to pipe 20 gougères.
- Using a moistened finger, gently press down any pointy tips on the mounds to smooth them out.
- Using a pastry brush, gently brush a light layer of egg wash on each mound, being careful not to let excess egg wash drip down onto the parchment. Alternatively, spray mounds lightly with nonstick cooking spray.
- Sprinkle a pinch of grated Gruyere on top of each mound, pushing down very gently to ensure it adheres to the surface.
- Bake until gougères are puffed, deeply golden brown, and feel hollow when lifted, 20 to 25 minutes. Turn off oven, crack the door open, and let stand for 30 minutes to dry and fully set the crust.
- Gougères are best served while still warm; if they cool down too much before serving, briefly reheat in a 350°F (177°C) oven before serving.
Special Equipment
3-quart saucier or saucepan, stand mixer, pastry bag and tip
Water or milk work in this recipe. Because of the richness of the cheese in the choux pastry, water is more than sufficient here; milk, meanwhile, will lead to deeper browning during baking.
If you want to make sure that each puff is the right size, you can prepare a template ahead of time. Take one sheet of parchment paper and, using a 1 1/2-inch round cutter as a guide, trace circles, then flip paper upside down and set it on the baking sheet.
Make-Ahead and Storage The baked gougères can be refrigerated in an airtight container for up to 3 days or, wrapped tightly in plastic and kept in an airtight container, they can be frozen for up to 1 month. To refresh refrigerated or frozen gougères, transfer to a baking sheet and reheat in a 350°F (177°C) oven until crisp, about 5 minutes.